1、LogBack入门案例
Logback是由log4j创始人设计的另一个开源日志组件,性能比log4j要好。官方网站:https://logback.qos.ch/index.htmlLogback主要分为三个模块:logback-core:其它两个模块的基础模块logback-classic:它是log4j的一个改良版本,同时它完整实现了slf4j APIlogback-access:访问模块与Servlet容器集成提供
Logback是由log4j创始人设计的另一个开源日志组件,性能比log4j要好。
官方网站:https://logback.qos.ch/index.html
Logback主要分为三个模块:
- logback-core:其它两个模块的基础模块
- logback-classic:它是log4j的一个改良版本,同时它完整实现了slf4j API
- logback-access:访问模块与Servlet容器集成提供通过Http来访问日志的功能 后续的日志代码都是通过SLF4J日志门面搭建日志系统,所以在代码是没有区别,主要是通过修改配置文件和pom.xml依赖
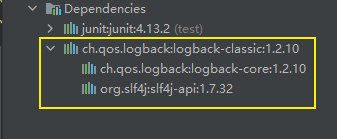
项目中无需单独引入slf4j,因为logback-classic依赖包里引用了slf4j
入门案例
第一步:创建maven项目,添加依赖
<project xmlns="http://maven.apache.org/POM/4.0.0"
	xmlns:xsi="http://www.w3.org/2001/XMLSchema-instance"
	xsi:schemaLocation="http://maven.apache.org/POM/4.0.0 http://maven.apache.org/xsd/maven-4.0.0.xsd">
	<modelVersion>4.0.0</modelVersion>
	<groupId>com.example</groupId>
	<artifactId>logging-test</artifactId>
	<version>0.0.1-SNAPSHOT</version>

	<properties>
		<maven.compiler.source>8</maven.compiler.source>
		<maven.compiler.target>8</maven.compiler.target>
	</properties>

	<dependencies>
		<dependency>
			<artifactId>junit</artifactId>
			<groupId>junit</groupId>
			<version>4.12</version>
		</dependency>

		<dependency>
			<groupId>ch.qos.logback</groupId>
			<artifactId>logback-classic</artifactId>
			<version>1.2.10</version>
		</dependency>

	</dependencies>

	<build>
		<plugins>
			<plugin>
				<groupId>org.apache.maven.plugins</groupId>
				<artifactId>maven-compiler-plugin</artifactId>
				<version>3.8.1</version>
				<configuration>
					<source>${maven.compiler.source}</source>
					<target>${maven.compiler.target}</target>
					<encoding>UTF-8</encoding>
				</configuration>
			</plugin>
		</plugins>
	</build>
</project>
第二步:测试代码
package com.example.test;

import org.junit.Test;
import org.slf4j.Logger;
import org.slf4j.LoggerFactory;

public class TestLogback {

	private static final Logger logger = LoggerFactory.getLogger(TestLogback.class);

	@Test
	public void testLogback() {
		logger.error("error");
		logger.warn("warn");
		logger.info("info");
		logger.debug("debug");
		logger.trace("trace");
	}
}

源码解读
1、我们从日志工厂的常见看起,这里是slf4j的实现
private static final Logger logger = LoggerFactory.getLogger(TestLogback.class);
核心方法只有一句
public static Logger getLogger(Class<?> clazz) {
        Logger logger = getLogger(clazz.getName());
       	....省略
        return logger;
    }
看一下getLogger方法,这里是先获取日志工厂,在从工厂中提取日志对象,我们不考虑日志对象,主要看看日志工厂的环境怎么初始化的
public static Logger getLogger(String name) {
        ILoggerFactory iLoggerFactory = getILoggerFactory();
        return iLoggerFactory.getLogger(name);
    }
进入getILoggerFactory方法看:
public static ILoggerFactory getILoggerFactory() {
        if (INITIALIZATION_STATE == 0) {
            Class var0 = LoggerFactory.class;
            synchronized(LoggerFactory.class) {
                if (INITIALIZATION_STATE == 0) {
                    INITIALIZATION_STATE = 1;
                    //重要方法
                    performInitialization();
                }
            }
        }
        ...省略
    }
进入performInitialization方法
private static final void performInitialization() {
		//一看bind就知道slf4j绑定logback的重要方法
        bind();
        if (INITIALIZATION_STATE == 3) {
            versionSanityCheck();
        }

    }
进入bind方法:
private final static void bind() {
        try {
            Set<URL> staticLoggerBinderPathSet = null;
            // skip check under android, see also
            // http://jira.qos.ch/browse/SLF4J-328
            if (!isAndroid()) {
                staticLoggerBinderPathSet = findPossibleStaticLoggerBinderPathSet();
                reportMultipleBindingAmbiguity(staticLoggerBinderPathSet);
            }
            // the next line does the binding
            //这一行做绑定操作,重要
            StaticLoggerBinder.getSingleton();
            ....省略
    }
进入getSingleton方法,此时已经进入桥接包的StaticLoggerBinder类了,log4j桥接包和jul桥接包中都有这个StaticLoggerBinder类:
 public static StaticLoggerBinder getSingleton() {
        return SINGLETON;
    }
我们翻下可以看到它有个静态代码块:
static {
        SINGLETON.init();
    }
进入init方法
void init() {
        try {
            try {
            	//感觉autoConfig是重要方法
                (new ContextInitializer(this.defaultLoggerContext)).autoConfig();
            ...省略

    }
进入autoConfig方法
 public void autoConfig() throws JoranException {
        StatusListenerConfigHelper.installIfAsked(this.loggerContext);
        //生成URL通过默认配置文件
        URL url = this.findURLOfDefaultConfigurationFile(true);
        if (url != null) {
            this.configureByResource(url);
        } else {
        	//spi机制获取配置类
            Configurator c = (Configurator)EnvUtil.loadFromServiceLoader(Configurator.class);
            if (c != null) {
                try {
                    c.setContext(this.loggerContext);
                    c.configure(this.loggerContext);
                } catch (Exception var4) {
                    throw new LogbackException(String.format("Failed to initialize Configurator: %s using ServiceLoader", c != null ? c.getClass().getCanonicalName() : "null"), var4);
                }
            } else {
            	//当没有配置文件时,默认的配置
                BasicConfigurator basicConfigurator = new BasicConfigurator();
                basicConfigurator.setContext(this.loggerContext);
                basicConfigurator.configure(this.loggerContext);
            }
        }

    }
我们可以看下findConfigFileURLFromSystemProperties方法:
    public URL findURLOfDefaultConfigurationFile(boolean updateStatus) {
        ClassLoader myClassLoader = Loader.getClassLoaderOfObject(this);
        URL url = findConfigFileURLFromSystemProperties(myClassLoader, updateStatus);
        if (url != null) {
            return url;
        }

        url = getResource(TEST_AUTOCONFIG_FILE, myClassLoader, updateStatus);
        if (url != null) {
            return url;
        }

        return getResource(AUTOCONFIG_FILE, myClassLoader, updateStatus);
    }


我们发现,它读取配置文件有优先级,先读取classpath下是否有logback-test.xml,没有则读取classpath下是否有logback.xml
debug发现Configurator c = EnvUtil.loadFromServiceLoader(Configurator.class);返回为null。
然后进入到BasicConfigurator,然后发现basicConfigurator.configure(loggerContext);比较重要
public void configure(LoggerContext lc) {
        addInfo("Setting up default configuration.");

        ConsoleAppender<ILoggingEvent> ca = new ConsoleAppender<ILoggingEvent>();
        ca.setContext(lc);
        ca.setName("console");
        LayoutWrappingEncoder<ILoggingEvent> encoder = new LayoutWrappingEncoder<ILoggingEvent>();
        encoder.setContext(lc);


        // same as
        // PatternLayout layout = new PatternLayout();
        // layout.setPattern("%d{HH:mm:ss.SSS} [%thread] %-5level %logger{36} - %msg%n");
        TTLLLayout layout = new TTLLLayout();

        layout.setContext(lc);
        layout.start();
        encoder.setLayout(layout);

        ca.setEncoder(encoder);
        ca.start();

        Logger rootLogger = lc.getLogger(Logger.ROOT_LOGGER_NAME);
        rootLogger.addAppender(ca);
    }
结果一看,rootLogger指向appender,appender指向encoder,encoder指向layout,比log4j多了encoder,但大致一样
我们在看TTLLLayout类
package ch.qos.logback.classic.layout;
import ch.qos.logback.classic.pattern.ThrowableProxyConverter;
import ch.qos.logback.classic.spi.ILoggingEvent;
import ch.qos.logback.classic.spi.IThrowableProxy;
import ch.qos.logback.core.CoreConstants;
import ch.qos.logback.core.LayoutBase;
import ch.qos.logback.core.util.CachingDateFormatter;
/**
* A layout with a fixed format. The output is equivalent to that produced by {@link ch.qos.logback.classic.PatternLayout PatternLayout} with the pattern:</p>
*
* <pre>%d{HH:mm:ss.SSS} [%thread] %-5level %logger{36} - %msg%n</pre>
*
*<p>TTLLLayout has the advantage of faster load time whereas {@link ch.qos.logback.classic.PatternLayout PatternLayout}
* requires roughly 40 milliseconds to load its parser classes. Note that the second run of PatternLayout will be much much faster (approx. 10 micro-seconds).</p>
*
* <p>Fixed format layouts such as TTLLLayout should be considered as an alternative to PatternLayout only if the extra 40 milliseconds at application start-up is considered significant.</p>
*
* @author Ceki Gülcü
* @since 1.1.6
*/
public class TTLLLayout extends LayoutBase<ILoggingEvent> {
CachingDateFormatter cachingDateFormatter = new CachingDateFormatter("HH:mm:ss.SSS");
ThrowableProxyConverter tpc = new ThrowableProxyConverter();
@Override
public void start() {
tpc.start();
super.start();
}
@Override
public String doLayout(ILoggingEvent event) {
if (!isStarted()) {
return CoreConstants.EMPTY_STRING;
}
StringBuilder sb = new StringBuilder();
long timestamp = event.getTimeStamp();
sb.append(cachingDateFormatter.format(timestamp));
sb.append(" [");
sb.append(event.getThreadName());
sb.append("] ");
sb.append(event.getLevel().toString());
sb.append(" ");
sb.append(event.getLoggerName());
sb.append(" - ");
sb.append(event.getFormattedMessage());
sb.append(CoreConstants.LINE_SEPARATOR);
IThrowableProxy tp = event.getThrowableProxy();
if (tp != null) {
String stackTrace = tpc.convert(event);
sb.append(stackTrace);
}
return sb.toString();
}
}
发现doLayout做的操作跟打印的出来格式一模一样的

CSDN联合极客时间,共同打造面向开发者的精品内容学习社区,助力成长!
更多推荐


 0
0 0
0- 0


 已为社区贡献3条内容

所有评论(0)