2.7 第 6 步:编写“Hello-world”Java Servlet
2.7 第 6 步:编写“Hello-world”Java Servlet甲的servlet是支持Java的HTTP服务器,诸如Apache Tomcat上内运行Java程序。Web 用户通过从 Web 浏览器(HTTP 客户端)发出适当的 URL 来调用 servlet。在您继续之前,我假设您熟悉 Java 编程并已安装以下内容:JDK(阅读“如何安装 JDK 和入门”)。一个编程文本编辑器,例
2.7 第 6 步:编写“Hello-world”Java Servlet
甲的servlet是支持Java的HTTP服务器,诸如Apache Tomcat上内运行Java程序。Web 用户通过从 Web 浏览器(HTTP 客户端)发出适当的 URL 来调用 servlet。
在您继续之前,我假设您熟悉 Java 编程并已安装以下内容:
- JDK(阅读“如何安装 JDK 和入门”)。
- 一个编程文本编辑器,例如 Sublime Text 或 Atom。
步骤 6(a) 编写一个“Hello-world”Java Servlet
Java servlet 是在 HTTP 服务器内运行的 Java 程序。Web 用户通过从浏览器(或 HTTP 客户端)发出 URL 来调用 servlet。
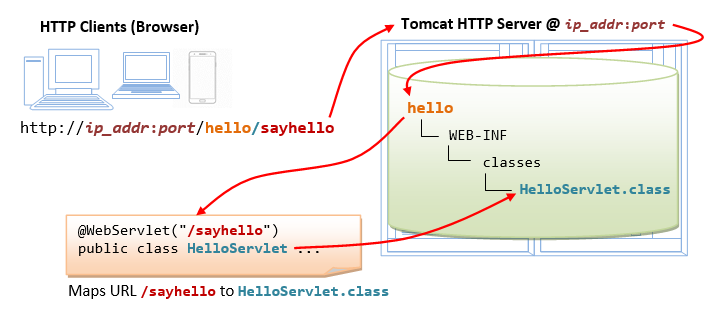
在这个例子中,我们将编写一个名为 的 Java servlet HelloServlet,它说“Hello, world!”。我们将配置为 Web 用户可以通过从他们的浏览器发出 URL 来调用这个 servlet ,如图所示:http://ip_addr:port/hello/sayhello
编写以下名为“ HelloServlet.java”的源代码并将其保存在您的应用程序“ classes”目录(即“ ”)下。这个 servlet 说“你好”,回显一些请求信息,并在每个请求上打印一个随机数。<TOMCAT_HOME>\webapps\hello\WEB-INF\classes\HelloServlet.java
1 2 3 4 5 6 7 8 9 10 11 12 13 14 15 16 17 18 19 20 21 22 23 24 25 26 27 28 29 30 31 32 33 34 35 36 |
// To save as "<TOMCAT_HOME>\webapps\hello\WEB-INF\classes\HelloServlet.java"
import java.io.*;
import javax.servlet.*;
import javax.servlet.http.*;
import javax.servlet.annotation.*;

@WebServlet("/sayhello")   // Configure the request URL for this servlet (Tomcat 7/Servlet 3.0 upwards)
public class HelloServlet extends HttpServlet {

   // The doGet() runs once per HTTP GET request to this servlet.
   @Override
   public void doGet(HttpServletRequest request, HttpServletResponse response)
         throws IOException, ServletException {

      // Set the response MIME type of the response message
      response.setContentType("text/html");
      // Allocate a output writer to write the response message into the network socket
      PrintWriter out = response.getWriter();

      // Write the response message, in an HTML page
      out.println("<!DOCTYPE html>");
      out.println("<html>");
      out.println("<head><title>Hello, World</title></head>");
      out.println("<body>");
      out.println("<h1>Hello, world!</h1>");  // says Hello
      // Echo client's request information
      out.println("<p>Request URI: " + request.getRequestURI() + "</p>");
      out.println("<p>Protocol: " + request.getProtocol() + "</p>");
      out.println("<p>PathInfo: " + request.getPathInfo() + "</p>");
      out.println("<p>Remote Address: " + request.getRemoteAddr() + "</p>");
      // Generate a random number upon each request
      out.println("<p>A Random Number: <strong>" + Math.random() + "</strong></p>");
      out.println("</body></html>");
      out.close();  // Always close the output writer
   }
} |
注意,在第 7 行,我们通过注解将其配置HelloServlet为 URL " /sayhello" ,适用于 Tomcat 7 以后。换句话说,完整的 URL 应该是触发 this 。@WebServlet("/sayhello")http://ip_addr:port/hello/sayhelloHelloServlet
步骤 6(b) 编译 Servlet (困难)
我们需要 Java Servlet API 来编译 servlet。Servlet API 不是 JDK 的一部分。Tomcat 在<TOMCAT_HOME>/lib/servlet-api.jar. 我们需要通过-cp(classpath) 选项将这个 JAR 文件包含在编译中,如下所示:
(适用于 Windows)
// Assume that Tomcat is installed in c:\myWebProject\tomcat
// Change directory to the Java source directory
c:
cd \myWebProject\tomcat\webapps\hello\WEB-INF\classes

// Compile with servlet API library
javac -cp .;c:\myWebProject\tomcat\lib\servlet-api.jar HelloServlet.java
(对于 macOS)
// Assume that Tomcat is installed in ~/myWebProject/tomcat
// Change directory to the Java source directory
cd ~/myWebProject/tomcat/webapps/hello/WEB-INF/classes

// Compile with Servlet API - Need to use $HOME instead of ~ in the "javac" command
javac -cp .:$HOME/myWebProject/tomcat/lib/servlet-api.jar HelloServlet.java
编译的输出是“ HelloServlet.class”。
使用“文件资源管理器”检查“ webapps/hello/WEB-INF/classes”文件夹以确保“ HelloServlet.class”已在正确的位置创建。
步骤 6(c) 调用 Servlet
重新启动您的 Tomcat 服务器(不需要,但以防万一……)。
要调用此 servlet,请启动浏览器,并发出如下配置的请求 URL:
http://localhost:9999/hello/sayhello
您将在 Web 浏览器中看到 servlet 的输出。
刷新浏览器,每次刷新都会看到一个新的随机数。换句话说,doGet()servlet的方法每个请求运行一次。
查看页面源代码
(对于 Firefox 和 Chrome)右键单击页面⇒“查看页面源”以查看 Web 浏览器接收到的输出(由服务器返回)。请注意,Web 浏览器仅接收 servlet 的输出(通过out.println()语句生成)。客户端无法访问 servlet 源代码(其中可能包含机密信息)。
(对于 macOS 的 Safari 浏览器)您需要启用“首选项”下的“开发人员菜单”才能启用“查看源”菜单。
<!DOCTYPE html>
<html>
<head><title>Hello, World</title></head>
<body>
<h1>Hello, world!</h1>
<p>Request URI: /hello/sayhello</p>
<p>Protocol: HTTP/1.1</p>
<p>PathInfo: null</p>
<p>Remote Address: 127.0.0.1</p>
<p>A Random Number: <strong>0.3523682325749493</strong></p>
</body>
</html>(跳过,除非...)可能的错误是“404 File Not Found”和“500 Internal Server Error”。阅读“如何调试”部分。
(可选)检查 HTTP 请求和响应消息
当您http://localhost:9999/hello/sayhello在 Web 浏览器上输入 URL(例如)时,会向服务器发送HTTP GET请求消息;服务器返回响应信息显示在浏览器上。您可以通过 Web 浏览器的开发工具检查请求和响应消息。
对于Firefox/Chrome,按 F12(称为 F12 调试器)以启用“Web 控制台”或“开发人员工具”。选择“控制台”或“网络”窗格。输入 URL http://localhost:9999/hello/sayhello(或刷新)。在“网络”或“网络”下。展开链接http://localhost:9999/hello/sayhello。HTTP 消息由标题和正文组成。检查请求头和正文;以及响应头和正文。
请求消息头如下:
GET http://localhost:9999/hello/sayhello HTTP/1.1
Host: localhost:9999
Accept: text/html,application/xhtml+xml,application/xml;q=0.9,*/*;q=0.8
Accept-Encoding: gzip, deflate
Accept-Language: en-US,en;q=0.5
Cache-Control:max-age=0
Connection: keep-alive
Upgrade-Insecure-Requests: 1
User-Agent: Mozilla/5.0 (Windows NT 10.0; WOW64; rv:52.0) Gecko/20100101 Firefox/52.0
对于此请求,没有请求消息正文。
响应消息头如下:
HTTP/1.1 200 OK
Date: xxx, xx xxx xxxx xx:xx:xx xxx
Content-Length: 286
Content-Type: text/html;charset=ISO-8859-1响应消息体如下:
<!DOCTYPE html>
<html>
<head><title>Hello, World</title></head>
<body>
<h1>Hello, world!</h1>
<p>Request URI: /hello/sayhello</p>
<p>Protocol: HTTP/1.1</p>
<p>PathInfo: null</p>
<p>Remote Address: 0:0:0:0:0:0:0:1</p>
<p>A Random Number: <strong>0.4480280769255568</strong></p>
</body></html>本节假设您熟悉“Java 数据库编程”和“MySQL 数据库服务器”。否则,请分别阅读“ Java 数据库程序”和“如何安装 MySQL 和入门”。
步骤 7(a) 在 MySQL 上设置数据库(已在 MySQL 练习中完成)
启动你的 MySQL 服务器。记下服务器的端口号。我将假设 MySQL 服务器运行在端口上3306,而 Tomcat 运行在端口上9999。
// For Windows: I shall assume that MySQL is installed in "c:\myWebProject\mysql"
c:
cd \myWebProject\mysql\bin
mysqld --console

// For macOS
// Use graphical control at "System Preferences" -> MySQL
启动 MySQL 客户端。我假设有一个名为“ myuser”的用户,密码为“ xxxx”。
// For Windows: I shall assume that MySQL is installed in "c:\myWebProject\mysql"
c:
cd \myWebProject\mysql\bin
mysql -u myuser -p

// For macOS: I shall assume that MySQL is installed in "/usr/local/mysql"
cd /usr/local/mysql/bin
./mysql -u myuser -p
运行以下 SQL 语句以创建一个名为“ ebookshop”的数据库,其中有一个名为“ books”的表,有 5 列:id、title、author、price、qty。
create database if not exists ebookshop;

use ebookshop;

drop table if exists books;
create table books (
   id     int,
   title  varchar(50),
   author varchar(50),
   price  float,
   qty    int,
   primary key (id));

insert into books values (1001, 'Java for dummies', 'Tan Ah Teck', 11.11, 11);
insert into books values (1002, 'More Java for dummies', 'Tan Ah Teck', 22.22, 22);
insert into books values (1003, 'More Java for more dummies', 'Mohammad Ali', 33.33, 33);
insert into books values (1004, 'A Cup of Java', 'Kumar', 55.55, 55);
insert into books values (1005, 'A Teaspoon of Java', 'Kevin Jones', 66.66, 66);

select * from books;
步骤 7(b) 安装 MySQL JDBC 驱动程序(在前面的 JDBC 练习中已经完成)
如果您还没有下载 MySQL JDBC 驱动程序,则需要下载。阅读“安装 MySQL JDBC 驱动程序”。
步骤 7(c) 将 MySQL JDBC 驱动程序复制到 Tomcat 的“lib” (重要!!!不要错过这一步!!!)
将 MySQL JDBC DriverJAR文件“ ”复制到 Tomcat 的目录中,即“ ”(对于 Windows)或“ ”(macOS)。mysql-connector-java-8.0.{xx}.jarlibc:\myWebProject\tomcat\lib~\myWebProject\tomcat\lib
步骤 7(d) 编写客户端 HTML 表单
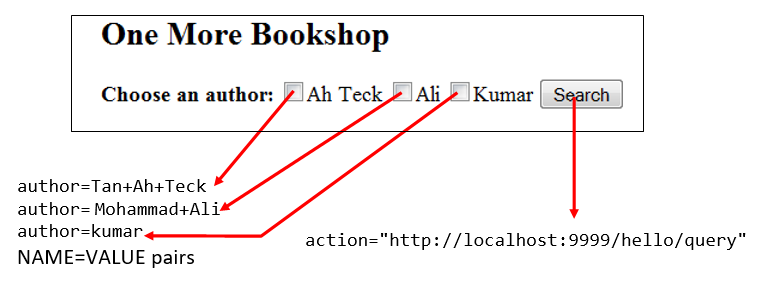
让我们编写一个 HTML 脚本来创建一个带有 3 个复选框和一个提交按钮的查询表单,如下图所示。querybook.html在您的应用程序根目录“ <TOMCAT_HOME>\webapps\hello”中将 HTML 文件另存为“ ”。
1 2 3 4 5 6 7 8 9 10 11 12 13 14 15 16 |
<!DOCTYPE html>
<html>
<head>
  <title>Yet Another Bookshop</title>
</head>
<body>
  <h2>One More Bookshop</h2>
  <form method="get" action="http://localhost:9999/hello/query">
    <b>Choose an author:</b>
    <input type="checkbox" name="author" value="Tan Ah Teck" />Ah Teck
    <input type="checkbox" name="author" value="Mohammad Ali" />Ali
    <input type="checkbox" name="author" value="Kumar" />Kumar
    <input type="submit" value="Search" />
  </form>
</body>
</html> |
您可以通过发出以下 URL 来浏览 HTML 页面:
http://localhost:9999/hello/querybook.html
选中一个框(例如,“Tan Ah Teck”)并单击“搜索”按钮。由于您尚未编写服务器端程序,因此预计您会收到错误“404 File Not Found”。
但是观察浏览器导航栏中的网址,转载如下:
http://localhost:9999/hello/query?author=Tan+Ah+Teck
查询字符串和 NAME=VALUE 对
上面的 URL 由两部分组成:
- 从标签的 "
action" 属性中提取的 URL<form>。 - 所谓的查询字符串以 a 开头,后跟从所选标签(即)中提取的“ ”对。请注意,空格被替换为(或-后跟十六进制空格的 ASCII 代码),因为 URL 中不允许出现空格。
'?'name=value<input>author=Tan+Ah+Teck'+'%20'%'
如果您选中两个框(例如,“Tan Ah Teck”和“Mohammad Ali”),您将触发一个查询字符串,其中包含两个由 .name 分隔的“name=value”对'&'。
http://localhost:9999/hello/query?author=Tan+Ah+Teck&author=Mohammad+Ali
步骤 7(e) 编写服务器端数据库查询 Servlet
下一步是编写一个Java servlet,它通过查询数据库来响应客户端的请求并返回查询结果。
1 2 3 4 5 6 7 8 9 10 11 12 13 14 15 16 17 18 19 20 21 22 23 24 25 26 27 28 29 30 31 32 33 34 35 36 37 38 39 40 41 42 43 44 45 46 47 48 49 50 51 52 53 54 55 56 57 58 59 60 61 62 63 64 |
// To save as "<TOMCAT_HOME>\webapps\hello\WEB-INF\classes\QueryServlet.java".
import java.io.*;
import java.sql.*;
import javax.servlet.*;
import javax.servlet.http.*;
import javax.servlet.annotation.*;

@WebServlet("/query")   // Configure the request URL for this servlet (Tomcat 7/Servlet 3.0 upwards)
public class QueryServlet extends HttpServlet {

   // The doGet() runs once per HTTP GET request to this servlet.
   @Override
   public void doGet(HttpServletRequest request, HttpServletResponse response)
               throws ServletException, IOException {
      // Set the MIME type for the response message
      response.setContentType("text/html");
      // Get a output writer to write the response message into the network socket
      PrintWriter out = response.getWriter();

      // Print an HTML page as the output of the query
      out.println("<!DOCTYPE html>");
      out.println("<html>");
      out.println("<head><title>Query Response</title></head>");
      out.println("<body>");

      try (
         // Step 1: Allocate a database 'Connection' object
         Connection conn = DriverManager.getConnection(
               "jdbc:mysql://localhost:3306/ebookshop?allowPublicKeyRetrieval=true&useSSL=false&serverTimezone=UTC",
               "myuser", "xxxx");   // For MySQL
               // The format is: "jdbc:mysql://hostname:port/databaseName", "username", "password"

         // Step 2: Allocate a 'Statement' object in the Connection
         Statement stmt = conn.createStatement();
      ) {
         // Step 3: Execute a SQL SELECT query
         String sqlStr = "select * from books where author = "
               + "'" + request.getParameter("author") + "'"   // Single-quote SQL string
               + " and qty > 0 order by price desc";

         out.println("<h3>Thank you for your query.</h3>");
         out.println("<p>Your SQL statement is: " + sqlStr + "</p>"); // Echo for debugging
         ResultSet rset = stmt.executeQuery(sqlStr);  // Send the query to the server

         // Step 4: Process the query result set
         int count = 0;
         while(rset.next()) {
            // Print a paragraph <p>...</p> for each record
            out.println("<p>" + rset.getString("author")
                  + ", " + rset.getString("title")
                  + ", $" + rset.getDouble("price") + "</p>");
            count++;
         }
         out.println("<p>==== " + count + " records found =====</p>");
      } catch(Exception ex) {
         out.println("<p>Error: " + ex.getMessage() + "</p>");
         out.println("<p>Check Tomcat console for details.</p>");
         ex.printStackTrace();
      }  // Step 5: Close conn and stmt - Done automatically by try-with-resources (JDK 7)

      out.println("</body></html>");
      out.close();
   }
} |
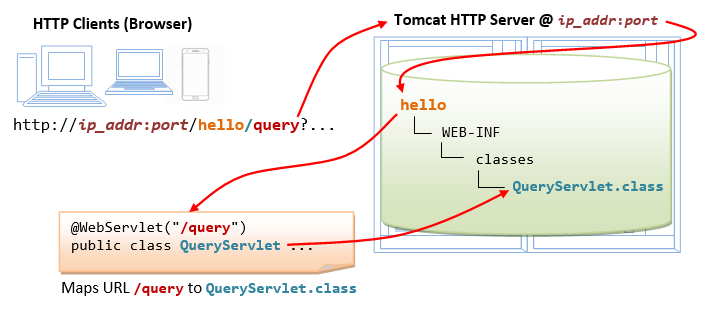
请注意,在第 8 行中,我们通过 annotation 将其配置QueryServlet为 URL " /query" @WebServlet("/query")。换句话说,触发这个的完整 URLQueryServlet是,它对应于前面写的“ ”标签的“ ”属性。http://ip_addr:port/hello/queryaction<form>querybook.html
QueryServlet.java使用 Servlet API 库编译“ ”,如下所示:
// Windows
c:
cd \myWebProject\tomcat\webapps\hello\WEB-INF\classes
javac -cp .;c:\myWebProject\tomcat\lib\servlet-api.jar QueryServlet.java

// macOS
cd ~/myWebProject/tomcat/webapps/hello/WEB-INF/classes
javac -cp .:$HOME/myWebProject/tomcat/lib/servlet-api.jar QueryServlet.java使用“文件资源管理器”,确认QueryServlet.class在“ classes”目录中生成了“ ”。
步骤 7(f) 从带有查询字符串的客户端表单调用 Servlet
发出以下 URL 以浏览querybook.html您之前创建的 HMTL 表单“ ”:
http://localhost:9999/hello/querybook.html选择一个作者(例如,“Tan Ah Teck”)并单击提交按钮,这会激活在<form>“ action”属性中编码的以下 URL ,以及 NAME=VALUE 对的查询字符串:
http://localhost:9999/hello/query?author=Tan+Ah+Teck上面的 URL "/ query" 映射到QueryServlet.
使用方法 request.getParameter(NAME)处理 NAME=VALUE 对
我们可以使用 方法request.getParameter()来处理NAME=VALUE查询字符串中的对。具体来说,该方法request.getParameter(NAME)返回VALUE,如下图所示:
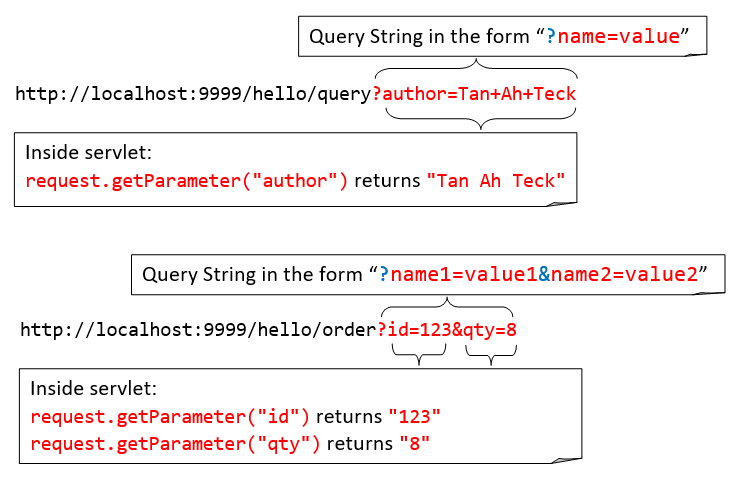
上面的查询字符串有一NAME=VALUE对author=Tan+Ah+Teck. 在第 38 行,该方法request.getParameter("author")返回一个字符串“ Tan Ah Teck”,插入到 SQLSELECT命令中:
select * from books where author = 'Tan Ah Teck' and qty > 0 order by price desc这样SELECT就根据用户在表单中的选择形成了SQL命令。
(跳过除非...)如果您看到空白屏幕或不正确的输出,请从 Tomcat 控制台查找错误消息!!!检查“如何调试”数据库 Servlet 错误。
2.9(过时和不要做)(Tomcat 7 之前)使用web.xml部署 Servlet
请跳过本节。我把它放在这里以防万一......
Tomcat 7/Servlet 3.0 支持部署 servlet的注解。在 Tomcat 7 之前,您需要通过配置文件中的部署描述符来部署 servlet 。@WebServlet("url")web.xml
创建以下名为“ web.xml”的配置文件,并将其保存在“ ”(即“ ”)下。webapps\hello\WEB-INF<TOMCAT_HOME>\webapps\hello\WEB-INF\web.xml
1 2 3 4 5 6 7 8 9 10 11 12 13 14 15 16 17 18 19 20 21 |
<?xml version="1.0" encoding="ISO-8859-1"?>
<web-app version="3.0"
  xmlns="http://java.sun.com/xml/ns/javaee"
  xmlns:xsi="http://www.w3.org/2001/XMLSchema-instance"
  xsi:schemaLocation="http://java.sun.com/xml/ns/javaee http://java.sun.com/xml/ns/javaee/web-app_3_0.xsd">

   <!-- To save as "hello\WEB-INF\web.xml" -->

   <servlet>
      <servlet-name>HelloWorld</servlet-name>
      <servlet-class>HelloServlet</servlet-class>
   </servlet>

   <!-- Note: All <servlet> elements MUST be grouped together and
     placed IN FRONT of the <servlet-mapping> elements -->

   <servlet-mapping>
      <servlet-name>HelloWorld</servlet-name>
      <url-pattern>/sayhello</url-pattern>
   </servlet-mapping>
</web-app> |
在上面的配置中,一个具有类文件“ HelloServlet.class”的 servlet被映射到请求 URL“ /sayhello”(通过任意的 servlet-name“ HelloWorld”),在这个 web 应用程序“ hello”下。换句话说,这个 servlet 的完整请求 URL 是“ ”。http://hostname:port/hello/sayhello
这个配置文件保存在你的 webapp " hello"下,只适用于这个特定的 webapp " hello"。
重新启动 Tomcat 服务器以刷新“ web.xml”文件。
注:每个Servlet,你需要写一对<servlet>和<servlet-mapping>元素与常用但任意<servlet-name>。请注意,所有<servlet>元素必须组合在一起并放置在<servlet-mapping>元素的前面。
3. 全栈 Web 开发人员
全栈 Web 开发人员是可以开发客户端和服务器软件的人。他/她需要熟悉客户端(前端)编程、服务器端(后端)编程和数据库。你现在更近了一步。
4.(跳过,除非...)如何调试?
“所有可能出错的事情都会出错。” 最重要的事情是找到错误消息!!!
总是...
- 重新启动 Tomcat(并检查 Tomcat 的控制台是否有错误消息)!!!
- 重启浏览器!!!
- 使用Cntl-F5(而不是刷新按钮或 F5)刷新浏览器以获取新副本,而不是从缓存中获取。
- 检查你的拼写!始终假设所有程序都区分大小写。如果可能,请不要键入、复制和粘贴!
- 最重要的是 - 找到错误消息!!!
- 检查 Tomcat 控制台上的错误消息。大多数错误消息都有几行屏幕。您需要从最后一行缓慢向上滚动以查找错误消息的第一行。
com.mysql.jdbc.exceptions.jdbc4.CommunicationsException: Communications link failure <== First line The last packet sent successfully to the server was 0 milliseconds ago. The driver has not received any packets from the server. at sun.reflect.NativeConstructorAccessorImpl.newInstance0(Native Method) at sun.reflect.NativeConstructorAccessorImpl.newInstance(NativeConstructorAccessorImpl.java:57) at sun.reflect.DelegatingConstructorAccessorImpl.newInstance(DelegatingConstructorAccessorImpl.java:45) at java.lang.reflect.Constructor.newInstance(Constructor.java:525) ...... ...... at com.mysql.jdbc.NonRegisteringDriver.connect(NonRegisteringDriver.java:305) at java.sql.DriverManager.getConnection(DriverManager.java:579) at java.sql.DriverManager.getConnection(DriverManager.java:221) at MySQLJdbcTestJDK7.main(MySQLJdbcTestJDK7.java:7) <== Your program's line number here (line 7) - 检查位于“
<TOMCAT_HOME>\logs”的 Tomcat 日志文件。“catalina.yyyy-mm-dd.log”显示Tomcat的启动消息。还要检查“localhost.yyyy-mm-dd.log”。
- 检查 Tomcat 控制台上的错误消息。大多数错误消息都有几行屏幕。您需要从最后一行缓慢向上滚动以查找错误消息的第一行。
- 如果在雷击之前一切都运行良好,问问自己“我改变了什么?”
SYMPTOM: Cannot start Tomcat after installation. The Tomcat console flashed and disappeared.
POSSIBLE SOLUTIONS:
  1. Run the script "configtest.bat" (for Windows) or "./configtest.sh" (for macOS/Linux) to check
     configuration files ("server.xml", "web.xml", "content.xml").
  2. Check the Tomcat's log files, located at "<TOMCAT_HOME>\logs".
     The "catalina.{yyyy-mm-dd}.log" shows the Tomcat's startup messages.
  3. Start the tomcat in the debugging mode by running "catalina debug" (or ./catalina.sh debug) and
     type "run" in the "jdb" prompt. Look for the error messages.
  4. If the error messages indicate that another Tomcat instance is running
     (java.net.BindException: Address already in use: JVM_Bind), kill the Tomcat process (See below).
  5. If the error messages indicate that another application is running on the Tomcat's port numbers,
     then you need to change the Tomcat's port number in "server.xml".
     You can issue command "netstat -an" to check the status of all the ports.
SYMPTOM: Cannot start Tomcat
ERROR MESSAGE:
SEVERE: StandardServer.await: create[localhost:8005]
java.net.BindException: Address already in use: JVM_Bind
POSSIBLE SOLUTIONS:
1. Another Tomcat instance has been started. Kill it (see below).
2. Another application is running on the Tomcat's port number.
Change the Tomcat's port number in "server.xml".
You can issue command "netstat -an" to check the status of all the ports.SYMPTOM: Cannot start Tomcat after installation
ERROR MESSAGE:
1. Neither the JAVA_HOME nor the JRE_HOME environment variable is defined
2. JRE_HOME environment variable is not defined
POSSIBLE SOLUTIONS:
1. Check if JAVA_HOME is properly defined, via command "set JAVA_HOME" (for Windows)
or "echo $JAVA_HOME" (for macOS/Linux). Check the spelling carefully.
2. Define environment variable JAVA_HOME according to "Step 2: Create an Environment Variable JAVA_HOME".SYMPTOM: Cannot start Tomcat after installation (for macOS)
ERROR MESSAGE:
"Permission Denied" running catalina.sh
POSSIBLE SOLUTIONS:
Check if catalina.sh is executable by the current user!定位/杀死Tomcat的进程
- 在windows中,启动“任务管理器”,Tomcat作为一个名为“
java.exe”的“进程”运行。您可能需要终止该进程。 - 在 macOS 中,启动“活动监视器”。选择“所有进程”并查找“
java.exe”。 - 在 Linux/macOS 中,您可以发出“
ps aux | grep tomcat”来定位 Tomcat 进程。记下进程 ID (pid)。您可以通过“ ”杀死Tomcat进程。kill -9 pid
ERROR MESSAGE:
  (Firefox) Unable to Connect
  (IE) Internet Explorer cannot display the webpage
  (Chrome) Oops! Google Chrome could not connect to ...
  (Safari) Safari can't connect to the server
PROBABLE CAUSES: You are simply not connecting to your Tomcat.
POSSIBLE SOLUTION:
  1. Check if your Tomcat server has been started?
  2. Check the hostname and port number of your URL (http://localhost:9999/...)

ERROR MESSAGE: Error 404 File Not Found
PROBABLE CAUSES: You have connected to your Tomcat.
  But Tomcat server cannot find the HTML file or Servlet that your requested.
POSSIBLE SOLUTION:
  1. Check your spelling! The path is case-sensitive!
  2. For HTML file request with URL http://localhost:9999/xxxx/filename.html:
     a. Open Tomcat's "webapps" directory, check if sub-directory "xxxx" exists. It is case-sensitive.
     b. Open the "xxxx" directory, check if "filename.html" exists.
  3. For servlet request with URL http://localhost:9999/xxxx/servletURL:
     a. Check the Tomcat's console for error message.
     b. Check the Tomcat console to make sure that your application "xxxx" has been deployed.
     c. Open Tomcat's "webapps" directory, check if sub-directory "xxxx" exists.
     d. Open the "xxxx" directory, check if sub-directory "WEB-INF" (uppercase with a dash) exists.
     e. Open the "WEB-INF", check if sub-directory "classes" (lowercase, plural) exists.
     f. Open your servlet, check if the servlet is mapped to servletURL
     g. Check if you have compiled the servlet. That is, the .class exisits (NOT .java).

ERROR MESSAGE: Error 500 Internal Server Error
POSSIBLE SOLUTION:
  Error 500 should have triggered many error message in the Tomcat's console.
  Go to the Tomcat's console, find the error message.

ERROR MESSAGE: Error 505: GET (or POST) method not supported
POSSIBLE SOLUTION:
Check you servlet to make sure that you have defined a doGet() (or doPost()) method.SYMPTOM: Cannot compile Java Servlet
ERROR MESSAGE: class xxxx is public, should be declared in a file named xxxx.java
CAUSES/SOLUTION:
In Java, the filename must be the same as the classname with extension of ".java".SYMPTOM: Cannot compile Java Servlet
ERROR MESSAGE: package javax.servlet does not exist
CAUSES/SOLUTION:
The Java Servlet library is missing. Read "Step 6(b) Compiling the Servlet"
again, again and again....SYMPTOM: A "new" servlet does not run
ERROR MESSAGE:
java.lang.IllegalStateException: Error starting child (in Tomcat console)
The servlets named [xxx] and [yyy] are both mapped to the url-pattern [zzz] which is not permitted
CAUSES/SOLUTION:
Check to ensure that no two servlets are mapping to the SAME URL in @WebServlet("url")ERROR MESSAGE: No suitable driver found
POSSIBLE SOLUTION:
Check if you have done Step 7(c) Copy the MySQL JDBC Drive to Tomcat's "lib".
ERROR MESSAGE: Communications link failure
POSSIBLE SOLUTION:
Check if you have started MySQL server.
ERROR MESSAGE: Access denied for user 'myuser'@'localhost' (using password: YES)
POSSIBLE SOLUTION:
Wrong username or password in your servlet's getConnection()
ERROR MESSAGE: Public Key Retrieval is not allowed
POSSIBLE SOLUTION:
Add jdbc:mysql://localhost:3306/ebookshop?allowPublicKeyRetrieval=true&useSSL=false to databaseURL.
ERROR MESSAGE: The server time zone value '...' is unrecognized or represents more than one time zone
POSSIBLE SOLUTION:
Add jdbc:mysql://localhost:3306/ebookshop?serverTimezone=UTC to databaseURL.
ERROR MESSAGE: You have an error in your SQL syntax ...
POSSIBLE SOLUTION:
SQL syntax error. Check you SQL statement.参考资料和资源
- Apache Tomcat 母网站@http: //tomcat.apache.org。
- Apache Tomcat 文档@“
<TOMCAT_HOME>\webapps\docs”。 - “如何安装 MySQL 并开始使用”。
- “ Java 数据库 (JDBC) 编程简介”。
- Jason Brittain、Ian F. Darwin,“ Tomcat 权威指南”,第 2 版,OReilly,2007 年。

CSDN联合极客时间,共同打造面向开发者的精品内容学习社区,助力成长!
更多推荐


 1
1 0
0- 0


 已为社区贡献34条内容

所有评论(0)