MyBatis学习(三)MyBatis与Spring框架的整合
MyBatis学习(三)MyBatis与Spring框架的整合本文介绍了MyBatis与Spring框架整合的过程及具体的步骤,用以加深巩固学习的过程示例工程:mybatis-demo3-spring本文是学习过程中的笔记,版权所有,转载请注明出处1、项目框架搭建1)Spring与MyBatis的整合需要引入一个mybatis-spring.jar的jar包2)mybatis-spring提供了整
MyBatis学习(三)MyBatis与Spring框架的整合
本文介绍了MyBatis与Spring框架整合的过程及具体的步骤,用以加深巩固学习的过程
示例工程:mybatis-demo3-spring
本文是学习过程中的笔记,版权所有,转载请注明出处
1、项目框架搭建
1)Spring与MyBatis的整合需要引入一个mybatis-spring.jar的jar包
2)mybatis-spring提供了整合所需要的的API
- SqlSessionFactoryBean:为整合应用提供SqlSession对象资源
- MapperFactoryBean:根据指定的Mapper接口生成Bean实例
- MapperScannerConfigurer:根据指定包批量扫描Mapper接口并生成实例
1.1、新建Maven项目
1)我们通过IDEA新建一个普通的Maven项目,项目的骨架结构如下:
├── docs
│   └── images
├── pom.xml
├── README.md
└── src
    ├── main
    │   ├── java
    │   └── resources
    └── test
        ├── java
        └── resources
1.2、引入pom依赖
1)这里我们需要引入mybatis-spring的依赖包,使用的版本是1.3.3
2)使用的连接池策略是dbcp的,这里要求版本号是1.4,一定注意使用该版本号,否则会报一些未知异常
3)mybatis的版本号为:3.4.6
pom.xml文件中的部分内容如下:
	<properties>
        <project.build.sourceEncoding>UTF-8</project.build.sourceEncoding>
        <maven.compiler.source>1.8</maven.compiler.source>
        <maven.compiler.target>1.8</maven.compiler.target>
        <spring.version>4.3.26.RELEASE</spring.version>
        <spring.data.jpa.version>1.3.5.RELEASE</spring.data.jpa.version>
    </properties>
    <dependencies>
        <!-- 单元测试 -->
        <dependency>
            <groupId>junit</groupId>
            <artifactId>junit</artifactId>
            <version>4.10</version>
            <scope>test</scope>
        </dependency>
        <!-- 引入mysql的数据库驱动 -->
        <dependency>
            <groupId>mysql</groupId>
            <artifactId>mysql-connector-java</artifactId>
            <version>5.1.30</version>
        </dependency>
        <!-- 引入MyBatis的maven jar包 -->
        <dependency>
            <groupId>org.mybatis</groupId>
            <artifactId>mybatis</artifactId>
            <version>3.4.6</version>
        </dependency>
        <!-- 引入MyBatis-Spring的包 -->
        <dependency>
            <groupId>org.mybatis</groupId>
            <artifactId>mybatis-spring</artifactId>
            <version>1.3.3</version>
        </dependency>
        <!-- 数据库连接池策略 -->
        <dependency>
            <groupId>commons-dbcp</groupId>
            <artifactId>commons-dbcp</artifactId>
            <version>1.4</version>
        </dependency>
        <dependency>
            <groupId>commons-collections</groupId>
            <artifactId>commons-collections</artifactId>
            <version>3.1</version>
        </dependency>
        <dependency>
            <groupId>org.springframework</groupId>
            <artifactId>spring-core</artifactId>
            <version>${spring.version}</version>
        </dependency>
        <dependency>
            <groupId>org.springframework</groupId>
            <artifactId>spring-beans</artifactId>
            <version>${spring.version}</version>
        </dependency>
        <dependency>
            <groupId>org.springframework</groupId>
            <artifactId>spring-context</artifactId>
            <version>${spring.version}</version>
        </dependency>
        <dependency>
            <groupId>org.springframework</groupId>
            <artifactId>spring-jdbc</artifactId>
            <version>${spring.version}</version>
        </dependency>
        <dependency>
            <groupId>org.springframework</groupId>
            <artifactId>spring-webmvc</artifactId>
            <version>${spring.version}</version>
        </dependency>
        <dependency>
            <groupId>org.springframework.data</groupId>
            <artifactId>spring-data-jpa</artifactId>
            <version>${spring.data.jpa.version}</version>
        </dependency>
    </dependencies>
2、MyBatis与Spring框架整合
2.1、知识讲解
2.1.1、SqlSessionFactoryBean
1)在前文中我们已经介绍过,我们单独使用MyBatis时,所有的操作都是围绕SqlSession展开的,一共涉及三个核心的对象,分别为:
SqlSessionFactoryBuilder
SqlSessionFactory
SqlSession
2)mybati整合spring之后,同样的需要SqlSession;mybatis-spring.jar提供了一个SqlSessionFactoryBean;该组件可以通过原生的SqlSessionFactoryBuilder生成SqlSessionFactory对象,为整合应用提供SqlSession对象
在Spring中定义SqlSessionFactoryBean对象
1)在Spring的配置文件中可以通過如下的配置,来定义我们的SqlSessionFactoryBean对象
<!-- 配置sqlSessionFactoryBean -->
<bean id="sqlSessionFactory" class="org.mybatis.spring.SqlSessionFactoryBean">
	<property name="dataSource" ref="myDataSource"/>
	<property name="mapperLocations" value="classpath:config/mapper/*.xml"/>
</bean>
2)可以通过SqlSessionFactoryBean的一些属性来指定MyBatis框架的配置信息
3)SqlSessionFactoryBean 的常用属性如下:
| Property | Description |
|---|---|
| dataSource | 用于指定连接数据库的数据源(required) |
| mapperLocation | 用于指定mapper文件的存放路径 |
| configLocation | 用于指定MyBatis的配置文件路径,也就是SqlConfig.xml文件。如果指定了该属性,那么会以该配置文件的内容作为配置信息构建对应的SqlSessionFactoryBuilder,但是后续属性指定的内容会覆盖该配置文件里面指定的对应内容 |
| typeAliasesPackage | 它一般对应我们的实体类所在的包,这个时候回自动取对应包中不包括报名的简单类名作为包括包名的别名。多个package之间可以用逗号或者分号等来进行分隔 |
| typeAliases | 数组类型,用来指定别名的。指定了这个属性后,MyBatis会把这个类型的名称作为这个类型的别名 |
2.1.2、MapperFactoryBean
1)MapperFactoryBean作用是根据Mapper接口获取我们想要的Mapper对象,它封装了原有session.getMapper()功能的实现
2)在定义MapperFactoryBean时,需要注入以下两个属性
- 一个是SqlSessionFactoryBean 对象,用于提供SqlSession
- 一个是返回Mapper对象的Mapper接口
在Spring中定义MapperFactoryBean对象
<!-- 手工定义mapper接口 -->
<bean id="studentInfoMapper" class="org.mybatis.spring.mapper.MapperFactoryBean">
	<property name="mapperInterface" value="com.iambest.study.dao.StudentInfoMapper"/>
	<property name="sqlSessionFactory" ref="sqlSessionFactory" />
</bean>
2.2、整合步骤
1)数据库配置文件db.properties
2)使用之前项目中
mybatis-demo2的entity,mapper,sqlMapper等配置文件;文章最后的附录章节包含详细的代码原文链接:
https://blog.csdn.net/Jack_David/article/details/1063079683)配置spring的核心配置文件
spring-mybatis-01.xml4)单元测试用例并测试
2.2.1、数据库的配置
数据库的配置文件db.propreties,我们一样使用之前的配置,内容如下:
# Oracle 数据库
#db.url=jdbc:oracle:thin:@localhost:1521:xe
#db.driver=oracle.jdbc.driver.OracleDriver
#db.username=david
#db.password=qwer1234

#mysql数据库
db.url=jdbc:mysql://127.0.0.1:3306/david?useUnicode=true&characterEncoding=utf8
db.driver=com.mysql.jdbc.Driver
db.username=root
db.password=123456
2.2.2、配置spring的核心配置文件
1)我们在resources/config路径下新建spring-mybatis-01.xml的配置文件,配置的内容包括:
引入数据库的配置文件db.properties
配置数据源dataSource,这里使用dbcp作为数据源
配置SqlSessionFactoryBean
手工定义mapper接口的配置
2)详细的内容如下:
spring-mybatis-01.xml
<?xml version="1.0" encoding="UTF-8"?>
<beans xmlns="http://www.springframework.org/schema/beans"
	xmlns:xsi="http://www.w3.org/2001/XMLSchema-instance"
	xmlns:context="http://www.springframework.org/schema/context"
	xmlns:jdbc="http://www.springframework.org/schema/jdbc"
	xmlns:jee="http://www.springframework.org/schema/jee"
	xmlns:tx="http://www.springframework.org/schema/tx"
	xsi:schemaLocation="
		http://www.springframework.org/schema/beans http://www.springframework.org/schema/beans/spring-beans-3.2.xsd
		http://www.springframework.org/schema/context http://www.springframework.org/schema/context/spring-context-3.2.xsd
		http://www.springframework.org/schema/jdbc http://www.springframework.org/schema/jdbc/spring-jdbc-3.2.xsd
		http://www.springframework.org/schema/jee http://www.springframework.org/schema/jee/spring-jee-3.2.xsd
		http://www.springframework.org/schema/tx http://www.springframework.org/schema/tx/spring-tx-3.2.xsd
		http://www.springframework.org/schema/data/jpa http://www.springframework.org/schema/data/jpa/spring-jpa-1.3.xsd">


		<!-- 引用我们的数据库的配置文件 -->
		<bean class="org.springframework.beans.factory.config.PropertyPlaceholderConfigurer">
			<property name="location" value="classpath:config/db.properties"/>
		</bean>

		<!-- 配置数据源 -->
		<bean id="myDataSource" class="org.apache.commons.dbcp.BasicDataSource" destroy-method="close">
			<property name="driverClassName" value="${db.driver}" />
			<property name="url" value="${db.url}"/>
			<property name="username" value="${db.username}"/>
			<property name="password" value="${db.password}"/>
		</bean>

		<!-- 配置sqlSessionFactoryBean -->
		<bean id="sqlSessionFactory" class="org.mybatis.spring.SqlSessionFactoryBean">
			<property name="dataSource" ref="myDataSource"/>
			<property name="mapperLocations" value="classpath:config/mapper/*.xml"/>
		</bean>

		<!-- 手工定义mapper接口 -->
		<bean id="studentInfoMapper" class="org.mybatis.spring.mapper.MapperFactoryBean">
			<property name="mapperInterface" value="com.iambest.study.dao.StudentInfoMapper"/>
			<property name="sqlSessionFactory" ref="sqlSessionFactory" />
		</bean>

</beans>
2.2.3、编写单元测试并执行
1)编写单元测试,并执行,在控制台中打印出执行的结果
单元测试代码
   @Test
    public void test01(){
        String config = "config/spring-mybatis-01.xml";
        ApplicationContext context = new ClassPathXmlApplicationContext(config);
        StudentInfoMapper studentInfoMapper = context.getBean("studentInfoMapper",StudentInfoMapper.class);
        System.out.println("studentInfoMapper=" + studentInfoMapper);
        List<StudentInfoDo> list = studentInfoMapper.findAll();
        for(StudentInfoDo studentInfoDo : list){
            System.out.println(studentInfoDo);
        }
    }
执行单元测试
1)控制台如下输出则表示成功:

3、使用Dao扫描
3.1、配置MapperScannerConfigurer
1)在定义MapperScannerConfigurer时,只需要指定一个basePackage即可
2)basePackage用于指定Mapper接口所在的包,在这个包及其自包下面的Mapper接口豆浆被搜索到,并把他们一一注册为MapperFactoryBean对象到Spring的容器中
3)多个包之间可以使用逗号或者分号进行分隔
3.1.1、修改spring的配置文件
1)我们这里新建一个spring-mybatis-scan.xml文件
2)在spring的配置文件中配置我们的MapperScannerConfigurer
spring-mybatis-scan.xml文件
<?xml version="1.0" encoding="UTF-8"?>
<beans xmlns="http://www.springframework.org/schema/beans"
	xmlns:xsi="http://www.w3.org/2001/XMLSchema-instance"
	xmlns:context="http://www.springframework.org/schema/context"
	xmlns:jdbc="http://www.springframework.org/schema/jdbc"
	xmlns:jee="http://www.springframework.org/schema/jee"
	xmlns:tx="http://www.springframework.org/schema/tx"
	xsi:schemaLocation="
		http://www.springframework.org/schema/beans http://www.springframework.org/schema/beans/spring-beans-3.2.xsd
		http://www.springframework.org/schema/context http://www.springframework.org/schema/context/spring-context-3.2.xsd
		http://www.springframework.org/schema/jdbc http://www.springframework.org/schema/jdbc/spring-jdbc-3.2.xsd
		http://www.springframework.org/schema/jee http://www.springframework.org/schema/jee/spring-jee-3.2.xsd
		http://www.springframework.org/schema/tx http://www.springframework.org/schema/tx/spring-tx-3.2.xsd
		http://www.springframework.org/schema/data/jpa http://www.springframework.org/schema/data/jpa/spring-jpa-1.3.xsd">

		<!-- 引用我们的数据库的配置文件 -->
		<bean class="org.springframework.beans.factory.config.PropertyPlaceholderConfigurer">
			<property name="location" value="classpath:config/db.properties"/>
		</bean>

		<!-- 配置数据源 -->
		<bean id="myDataSource" class="org.apache.commons.dbcp.BasicDataSource" destroy-method="close">
			<property name="driverClassName" value="${db.driver}" />
			<property name="url" value="${db.url}"/>
			<property name="username" value="${db.username}"/>
			<property name="password" value="${db.password}"/>
		</bean>

		<!-- 配置sqlSessionFactoryBean -->
		<bean id="sqlSessionFactory" class="org.mybatis.spring.SqlSessionFactoryBean">
			<property name="dataSource" ref="myDataSource"/>
			<!-- 扫描下面路径下的所有xml文件 -->
			<property name="mapperLocations" value="classpath:config/mapper/*.xml"/>
		</bean>

		<!-- 开启dao扫描,自动将所有的Mapper接口类注入到Spring的容器中 -->
		<bean class="org.mybatis.spring.mapper.MapperScannerConfigurer">
			<property name="basePackage" value="com.iambest.study.dao"/>
		</bean>

</beans>
3.1.2、编写单元测试并执行
1)通过单元测试的方式,测试我们的配置
单元测试代码
    @Test
    public void testScan(){
        String config = "config/spring-mybatis-scan.xml";
        ApplicationContext context = new ClassPathXmlApplicationContext(config);
        StudentInfoMapper studentInfoMapper = context.getBean("studentInfoMapper",StudentInfoMapper.class);
        System.out.println("studentInfoMapper=" + studentInfoMapper);
        List<StudentInfoDo> list = studentInfoMapper.findAll();
        for(StudentInfoDo studentInfoDo : list){
            System.out.println(studentInfoDo);
        }
    }
执行单元测试
1)指定单元测试,控制台输出如下的结果,表示配置成功:

4、使用自定义注解的Dao扫描
1)如果我们指定的dao的包下面并不完全是我们定义的Mapper接口,或者说我们仅仅只需要其中的部分Mapper接口注册到Spring的容器中
2)这时,我们需要MapperScannerConfigurer的另外两个属性,用以缩小扫描搜索的范围,一个是annotationClass,一个是markerInterface
- annotationClass:用于指定一个注解标记,当指定了annotationClass时,MapperScannerConfigurer将只注册使用了annotationClass注解标记的接口
- markerInterface:用于指定一个接口,当指定了markerInterface时,MapperScannerConfigurer将只注册继承自markerInterface的接口
- 本例中我们以annotationClass为例进行演示
4.1、自定义注解接口
1)我们这里自己定义一个注解,用于后面定义MapperScannerConfigurer时使用
2)使用
@interface进行标记
package com.iambest.study.annotation;

/**
 * @author zhangwei
 * @since 1.0.0
 * @version 1.0.0
 */
public @interface MyBatisRepository {

    String value() default "";
}
4.2、配置
4.2.1、配置spring的配置文件
1)这里我们新建一个spring的容器配置文件mybatis-spring-scan-annotation.xml
2)在配置MapperScannerConfigurer时,指定annotationClass为我们上述自定义的注解
- mybatis-spring-scan-annotation.xml文件
<?xml version="1.0" encoding="UTF-8"?>
<beans xmlns="http://www.springframework.org/schema/beans"
	xmlns:xsi="http://www.w3.org/2001/XMLSchema-instance"
	xmlns:context="http://www.springframework.org/schema/context"
	xmlns:jdbc="http://www.springframework.org/schema/jdbc"
	xmlns:jee="http://www.springframework.org/schema/jee"
	xmlns:tx="http://www.springframework.org/schema/tx"
	xsi:schemaLocation="
		http://www.springframework.org/schema/beans http://www.springframework.org/schema/beans/spring-beans-3.2.xsd
		http://www.springframework.org/schema/context http://www.springframework.org/schema/context/spring-context-3.2.xsd
		http://www.springframework.org/schema/jdbc http://www.springframework.org/schema/jdbc/spring-jdbc-3.2.xsd
		http://www.springframework.org/schema/jee http://www.springframework.org/schema/jee/spring-jee-3.2.xsd
		http://www.springframework.org/schema/tx http://www.springframework.org/schema/tx/spring-tx-3.2.xsd
		http://www.springframework.org/schema/data/jpa http://www.springframework.org/schema/data/jpa/spring-jpa-1.3.xsd">

		<!-- 引用我们的数据库的配置文件 -->
		<bean class="org.springframework.beans.factory.config.PropertyPlaceholderConfigurer">
			<property name="location" value="classpath:config/db.properties"/>
		</bean>

		<!-- 配置数据源 -->
		<bean id="myDataSource" class="org.apache.commons.dbcp.BasicDataSource" destroy-method="close">
			<property name="driverClassName" value="${db.driver}" />
			<property name="url" value="${db.url}"/>
			<property name="username" value="${db.username}"/>
			<property name="password" value="${db.password}"/>
		</bean>

		<!-- 配置sqlSessionFactoryBean -->
		<bean id="sqlSessionFactory" class="org.mybatis.spring.SqlSessionFactoryBean">
			<property name="dataSource" ref="myDataSource"/>
			<!-- 扫描下面路径下的所有xml文件 -->
			<property name="mapperLocations" value="classpath:config/mapper/*.xml"/>
		</bean>

		<!-- 开启自定义注解dao扫描,自动将所有带有指定注解的的Mapper接口类注入到Spring的容器中 -->
		<bean class="org.mybatis.spring.mapper.MapperScannerConfigurer">
			<property name="annotationClass" value="com.iambest.study.annotation.MyBatisRepository"/>
			<property name="basePackage" value="com.iambest.study.dao"/>
		</bean>
</beans>
4.2.2、修改我们的Mapper接口,加上自定义注解
1)如下示例:
2)作为比对,我们将同目录下的OrderInfoMapper中不加上自定义的注解,用以验证测试的结果
- StudentInfoMapper
package com.iambest.study.dao;

import com.iambest.study.annotation.MyBatisRepository;
import com.iambest.study.entity.StudentInfoDo;

import java.util.List;

/**
 * 数据库Dao层
 */
@MyBatisRepository
public interface StudentInfoMapper {

    /**
     * 登记学生信息
     * @param studentInfoDo
     */
    public void addStudentInfo(StudentInfoDo studentInfoDo);

    /**
     * 更新学生信息
     * @param studentInfoDo
     */
    public void updateById(StudentInfoDo studentInfoDo);

    /**
     * 根据ID删除
     * @param id
     */
    public void deleteById(String id);

    /**
     * 根据ID进行查询
     * @param id
     * @return 查询的数据实体
     */
    public StudentInfoDo selectById(String id);

    /**
     * 查询所有的记录
     * @return
     */
    public List<StudentInfoDo> findAll();
}
- OrderInfoMapper不加自定义注解
package com.iambest.study.dao;

import com.iambest.study.entity.OrderInfo;

import java.util.List;

/**
 *
 */
public interface OrderInfoMapper {
    /**
     * 查询所有的订单信息
     * @return
     */
    public List<OrderInfo> findAllOrderInfos();
}
4.2.3、编写单元测试并执行
单元测试代码
1)通过编写单元测试代码,验证我们的程序
2)这里我们作为比对,我们通过OrderInfoMapper来作为参考
/**
 * 测试自定义注解扫描注册dao
 */
@Test
public void testScanAnnotation() {
    String config = "config/spring-mybatis-scan-annotation.xml";
    ApplicationContext context = new ClassPathXmlApplicationContext(config);

    // 该类会扫描并注册到Spring的容器中
    StudentInfoMapper studentInfoMapper = context.getBean("studentInfoMapper",StudentInfoMapper.class);
    System.out.println("studentInfoMapper=" + studentInfoMapper);
    List<StudentInfoDo> list = studentInfoMapper.findAll();
    for(StudentInfoDo studentInfoDo : list){
        System.out.println(studentInfoDo);
    }

    // 这里会报错,找不到bean
    OrderInfoMapper orderInfoMapper = context.getBean(OrderInfoMapper.class);
    System.out.println("orderInfoMapper=" + orderInfoMapper);
}
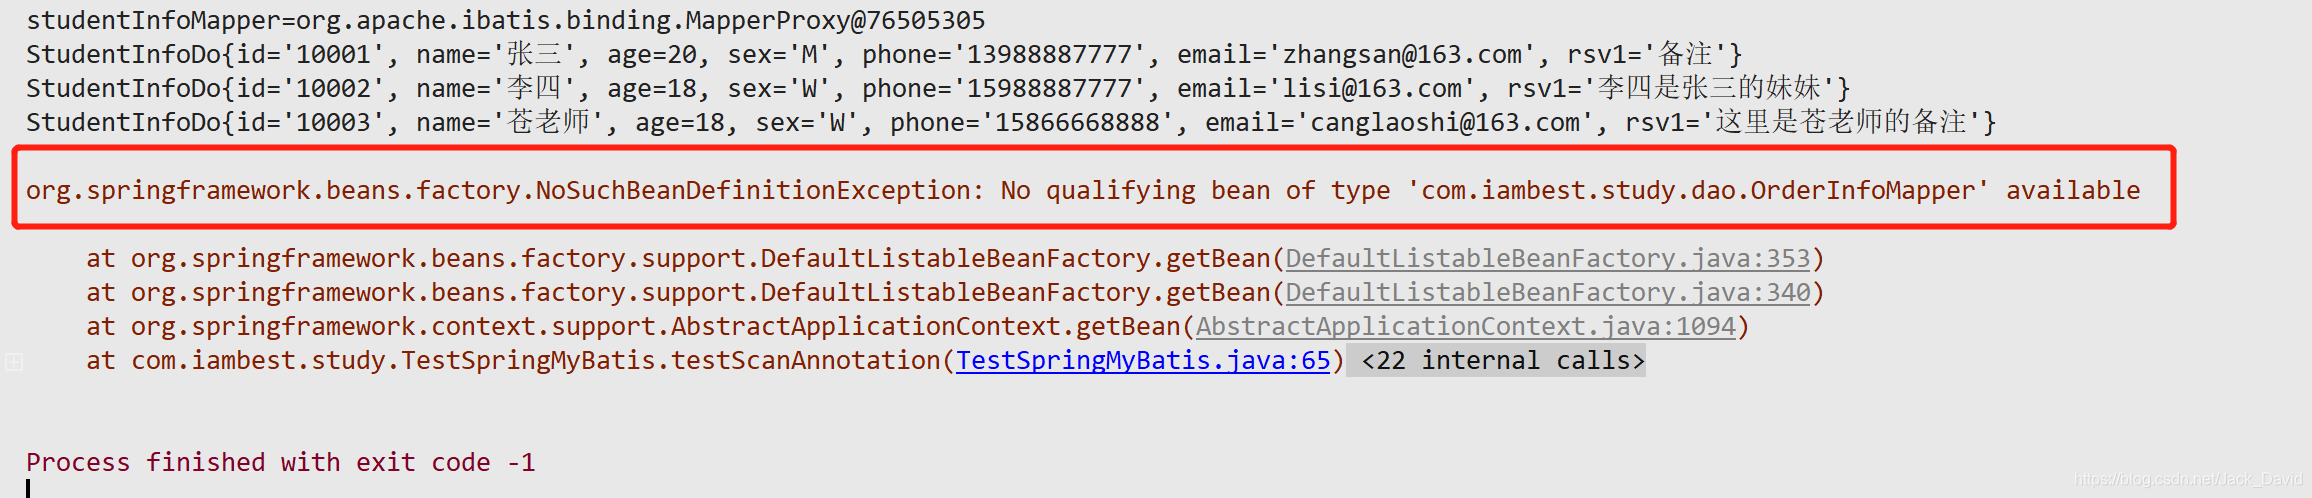
执行单元测试
1)执行单元测试,看到如下的输出
可以看到StudentInfoMapper的查询可以正确的执行,但是OrderInfoMapper这里会报错提示找不到Bean,说明没有被扫描注入到Spring容器中,验证了我们的程序
5、使用SqlSessionTemplate支持
1)mybatis-spring 同时还提供了一个SqlSessionTemplate组件,也可以将该组件对象注入给程序中的DAO,在DAO中利用SqlSessionTemplate编程
2)主要的实现步骤如下:
a)定义Dao的接口
b)定义Dao接口的实现类,并将SqlSessionTemplate声明为该实现类的一个属性,通过template的方法来实现数据库的操作,这里指定的方法要在mapper.xml中定义
c)在spring中声明该SqlSessionTemplate对象
5.1、编码实现
5.1.1、定义一个Dao接口
1)我们这里在com.iambest.study.dao目录下新建一个接口类StudentInfoDao,并声明一个方法
2)完整的代码如下
- StudentInfoDao
package com.iambest.study.dao;

import com.iambest.study.entity.StudentInfoDo;

import java.util.List;

/**
 * 定义Dao接口
 */
public interface StudentInfoDao {
    List<StudentInfoDo> findAll();
}
5.1.2、定义该Dao的实现类
1)在com.iambest.study.dao.impl中新建一个实现类MyBatisStudentInfoDaoImpl
2)将SqlSessionTemplate作为该实现类的一个属性,并且加上Autowired注解
3)通过SqlSessionTemplate操作mapper中的接口方法
代码如下:
- MyBatisStudentInfoDaoImpl
package com.iambest.study.dao.impl;

import com.iambest.study.dao.StudentInfoDao;
import com.iambest.study.entity.StudentInfoDo;
import org.mybatis.spring.SqlSessionTemplate;
import org.springframework.beans.factory.annotation.Autowired;
import org.springframework.stereotype.Repository;

import java.util.List;

/**
 * 实现类
 */
@Repository
public class MyBatisStudentInfoDaoImpl implements StudentInfoDao {
    @Autowired
    private SqlSessionTemplate template;

    @Override
    public List<StudentInfoDo> findAll() {

        List<StudentInfoDo> list = template.selectList("findAll");

        return list;
    }
}
5.1.3、配置Spring的核心配置文件
1)这里我们新建一个Spring的配置文件spring-mybatis-scan-autoconfig.xml
2)声明我们的SQLSessionTemplate,并指定一个构造参数为SqlSessionFactoryBean对象
3)开启自动的注解扫描,一定要开启
- spring-mybatis-scan-autoconfig.xml
<?xml version="1.0" encoding="UTF-8"?>
<beans xmlns="http://www.springframework.org/schema/beans"
	xmlns:xsi="http://www.w3.org/2001/XMLSchema-instance"
	xmlns:context="http://www.springframework.org/schema/context"
	xmlns:jdbc="http://www.springframework.org/schema/jdbc"
	xmlns:jee="http://www.springframework.org/schema/jee"
	xmlns:tx="http://www.springframework.org/schema/tx"
	xsi:schemaLocation="
		http://www.springframework.org/schema/beans http://www.springframework.org/schema/beans/spring-beans-3.2.xsd
		http://www.springframework.org/schema/context http://www.springframework.org/schema/context/spring-context-3.2.xsd
		http://www.springframework.org/schema/jdbc http://www.springframework.org/schema/jdbc/spring-jdbc-3.2.xsd
		http://www.springframework.org/schema/jee http://www.springframework.org/schema/jee/spring-jee-3.2.xsd
		http://www.springframework.org/schema/tx http://www.springframework.org/schema/tx/spring-tx-3.2.xsd
		http://www.springframework.org/schema/data/jpa http://www.springframework.org/schema/data/jpa/spring-jpa-1.3.xsd">
		<!-- 引用我们的数据库的配置文件 -->
		<bean class="org.springframework.beans.factory.config.PropertyPlaceholderConfigurer">
			<property name="location" value="classpath:config/db.properties"/>
		</bean>

		<!-- 配置数据源 -->
		<bean id="myDataSource" class="org.apache.commons.dbcp.BasicDataSource" destroy-method="close">
			<property name="driverClassName" value="${db.driver}" />
			<property name="url" value="${db.url}"/>
			<property name="username" value="${db.username}"/>
			<property name="password" value="${db.password}"/>
		</bean>

		<!-- 配置sqlSessionFactoryBean -->
		<bean id="sqlSessionFactory" class="org.mybatis.spring.SqlSessionFactoryBean">
			<property name="dataSource" ref="myDataSource"/>
			<!-- 扫描下面路径下的所有xml文件 -->
			<property name="mapperLocations" value="classpath:config/mapper/*.xml"/>
		</bean>

		<!-- 定义sqlSessionTemplate -->
		<bean class="org.mybatis.spring.SqlSessionTemplate">
			<constructor-arg index="0" ref="sqlSessionFactory"/>
		</bean>

		<!-- 开启spring的注解扫描 -->
		<context:component-scan base-package="com.iambest.study.dao.impl"/>
</beans>
5.1.4、编写单元测试并执行
单元测试代码
1)编写单元测试代码,验证我们上述的配置,单元测试代码如下:
/**
 * 测试使用SQLSessionTemplate,并开启自动注解扫描
 */
@Test
public void testScannAutoConfiguration() {
    String config = "config/spring-mybatis-scan-autoconfig.xml";
    ApplicationContext context = new ClassPathXmlApplicationContext(config);

    // 该类会扫描并注册到Spring的容器中
    StudentInfoDao dao = context.getBean(StudentInfoDao.class);
    System.out.println("studentInfoMapper=" + dao);
    List<StudentInfoDo> list = dao.findAll();
    for(StudentInfoDo studentInfoDo : list){
        System.out.println(studentInfoDo);
    }
}
执行单元测试
1 )执行单元测试,看到控制台输出的内容如下,表示成功:

6、代码附录
6.1、第二章框架整合的代码
entity数据库实体类StudentInfoDo
package com.iambest.study.entity;

import java.util.Objects;

/**
 * StudentInfoDo数据实体</br>
 *
 * <b>映射的是t_student_info数据库表的字段</b>
 *
 */
public class StudentInfoDo {

    private String id;

    private String name;

    private Integer age;

    private String sex;

    private String phone;

    private String email;

    private String rsv1;

    public String getId() {
        return id;
    }

    public void setId(String id) {
        this.id = id;
    }

    public String getName() {
        return name;
    }

    public void setName(String name) {
        this.name = name;
    }

    public Integer getAge() {
        return age;
    }

    public void setAge(Integer age) {
        this.age = age;
    }

    public String getSex() {
        return sex;
    }

    public void setSex(String sex) {
        this.sex = sex;
    }

    public String getPhone() {
        return phone;
    }

    public void setPhone(String phone) {
        this.phone = phone;
    }

    public String getEmail() {
        return email;
    }

    public void setEmail(String email) {
        this.email = email;
    }

    public String getRsv1() {
        return rsv1;
    }

    public void setRsv1(String rsv1) {
        this.rsv1 = rsv1;
    }

    @Override
    public boolean equals(Object o) {
        if (this == o) {
            return true;
        }
        if (o == null || getClass() != o.getClass()) {
            return false;
        }
        StudentInfoDo that = (StudentInfoDo) o;
        return Objects.equals(id, that.id);
    }

    @Override
    public int hashCode() {
        return Objects.hash(id);
    }

    @Override
    public String toString() {
        return "StudentInfoDo{" +
                "id='" + id + '\'' +
                ", name='" + name + '\'' +
                ", age=" + age +
                ", sex='" + sex + '\'' +
                ", phone='" + phone + '\'' +
                ", email='" + email + '\'' +
                ", rsv1='" + rsv1 + '\'' +
                '}';
    }
}
mapper接口类StudentInfoMapper
package com.iambest.study.dao;

import com.iambest.study.annotation.MyBatisRepository;
import com.iambest.study.entity.StudentInfoDo;

import java.util.List;

/**
 * 数据库Dao层
 */
public interface StudentInfoMapper {

    /**
     * 登记学生信息
     * @param studentInfoDo
     */
    public void addStudentInfo(StudentInfoDo studentInfoDo);

    /**
     * 更新学生信息
     * @param studentInfoDo
     */
    public void updateById(StudentInfoDo studentInfoDo);

    /**
     * 根据ID删除
     * @param id
     */
    public void deleteById(String id);

    /**
     * 根据ID进行查询
     * @param id
     * @return 查询的数据实体
     */
    public StudentInfoDo selectById(String id);

    /**
     * 查询所有的记录
     * @return
     */
    public List<StudentInfoDo> findAll();
}
mapper.xml配置文件
<?xml version="1.0" encoding="UTF-8" ?>
<!DOCTYPE mapper PUBLIC "-//mybatis.org//DTD Mapper 3.0//EN" "http://mybatis.org/dtd/mybatis-3-mapper.dtd">
<mapper namespace="com.iambest.study.dao.StudentInfoMapper">
    <!-- 登记数据库表 -->
    <insert id="addStudentInfo" parameterType="com.iambest.study.entity.StudentInfoDo">
        insert into t_student_info (id,name,age,sex,phone,email,rsv1)
        values
        (#{id},#{name},#{age},#{sex},#{phone},#{email},#{rsv1})
    </insert>
    <!-- 根据ID更新数据库 -->
    <update id="updateById" parameterType="com.iambest.study.entity.StudentInfoDo">
        update t_student_info set NAME=#{name},AGE=#{age},SEX=#{sex},PHONE=#{phone},
        EMAIL=#{email},RSV1=#{rsv1} where ID=#{id}
    </update>

    <!-- 根据ID进行删除 -->
    <delete id="deleteById" parameterType="java.lang.String">
        delete from t_student_info where ID=#{id}
    </delete>

    <!-- 根据ID查询 -->
    <select id="selectById" resultType="com.iambest.study.entity.StudentInfoDo">
        select id,name,age,sex,phone,email,rsv1 from t_student_info where ID=#{id}
    </select>

    <select id="findAll" resultType="com.iambest.study.entity.StudentInfoDo">
        select id,name,age,sex,phone,email,rsv1 from t_student_info
    </select>
</mapper>
spring-mybatis-01.xml
<?xml version="1.0" encoding="UTF-8"?>
<beans xmlns="http://www.springframework.org/schema/beans"
	xmlns:xsi="http://www.w3.org/2001/XMLSchema-instance"
	xmlns:context="http://www.springframework.org/schema/context"
	xmlns:jdbc="http://www.springframework.org/schema/jdbc"
	xmlns:jee="http://www.springframework.org/schema/jee"
	xmlns:tx="http://www.springframework.org/schema/tx"
	xsi:schemaLocation="
		http://www.springframework.org/schema/beans http://www.springframework.org/schema/beans/spring-beans-3.2.xsd
		http://www.springframework.org/schema/context http://www.springframework.org/schema/context/spring-context-3.2.xsd
		http://www.springframework.org/schema/jdbc http://www.springframework.org/schema/jdbc/spring-jdbc-3.2.xsd
		http://www.springframework.org/schema/jee http://www.springframework.org/schema/jee/spring-jee-3.2.xsd
		http://www.springframework.org/schema/tx http://www.springframework.org/schema/tx/spring-tx-3.2.xsd
		http://www.springframework.org/schema/data/jpa http://www.springframework.org/schema/data/jpa/spring-jpa-1.3.xsd">

		<!-- 引用我们的数据库的配置文件 -->
		<bean class="org.springframework.beans.factory.config.PropertyPlaceholderConfigurer">
			<property name="location" value="classpath:config/db.properties"/>
		</bean>

		<!-- 配置数据源 -->
		<bean id="myDataSource" class="org.apache.commons.dbcp.BasicDataSource" destroy-method="close">
			<property name="driverClassName" value="${db.driver}" />
			<property name="url" value="${db.url}"/>
			<property name="username" value="${db.username}"/>
			<property name="password" value="${db.password}"/>
		</bean>

		<!-- 配置sqlSessionFactoryBean -->
		<bean id="sqlSessionFactory" class="org.mybatis.spring.SqlSessionFactoryBean">
			<property name="dataSource" ref="myDataSource"/>
			<property name="mapperLocations" value="classpath:config/mapper/*.xml"/>
		</bean>

		<!-- 手工定义mapper接口 -->
		<bean id="studentInfoMapper" class="org.mybatis.spring.mapper.MapperFactoryBean">
			<property name="mapperInterface" value="com.iambest.study.dao.StudentInfoMapper"/>
			<property name="sqlSessionFactory" ref="sqlSessionFactory" />
		</bean>

</beans>
单元测试代码
   @Test
    public void test01(){
        String config = "config/spring-mybatis-01.xml";
        ApplicationContext context = new ClassPathXmlApplicationContext(config);
        StudentInfoMapper studentInfoMapper = context.getBean("studentInfoMapper",StudentInfoMapper.class);
        System.out.println("studentInfoMapper=" + studentInfoMapper);
        List<StudentInfoDo> list = studentInfoMapper.findAll();
        for(StudentInfoDo studentInfoDo : list){
            System.out.println(studentInfoDo);
        }
    }

CSDN联合极客时间,共同打造面向开发者的精品内容学习社区,助力成长!
更多推荐


 0
0 0
0- 0


 已为社区贡献1条内容

所有评论(0)