Android高级-Paint,Canvas,Path详解
Pain详解:Paint 常用API其中:setStyle中,有三个可选值:setStrokeCap: 圆角效果三个可选值setStrokeJoin :拐角的样式paint.setShader(new SweepGradient(200,200...
Pain详解:

Paint 常用API
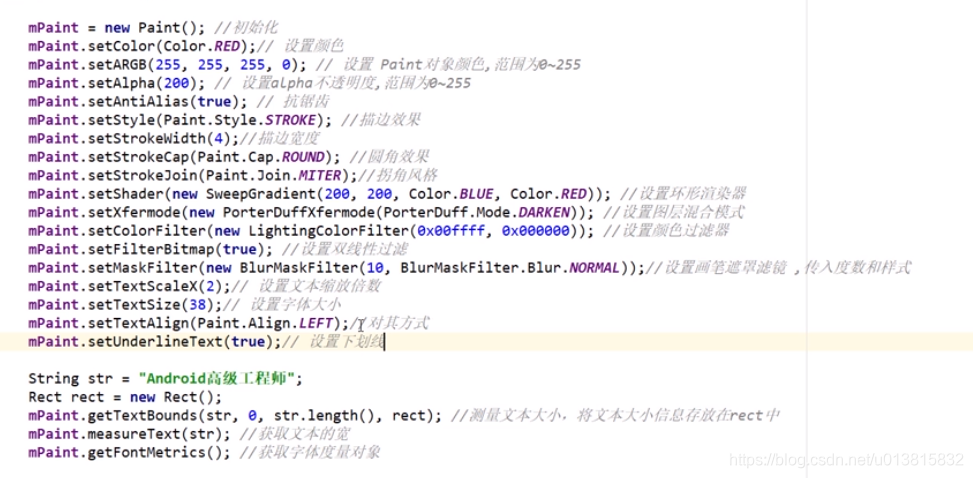
其中:
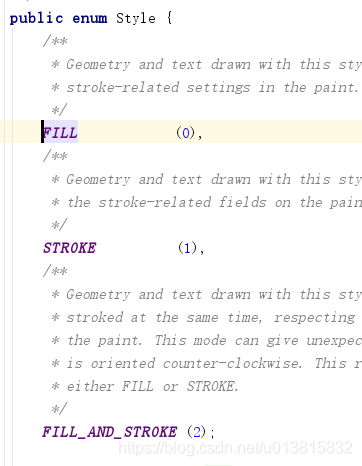
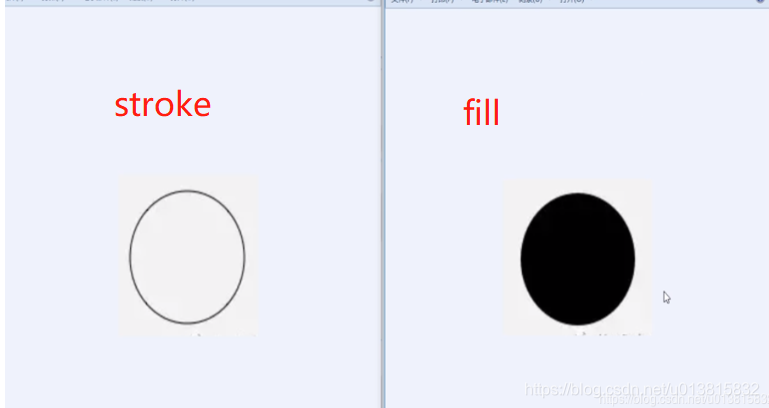
setStyle中,有三个可选值:
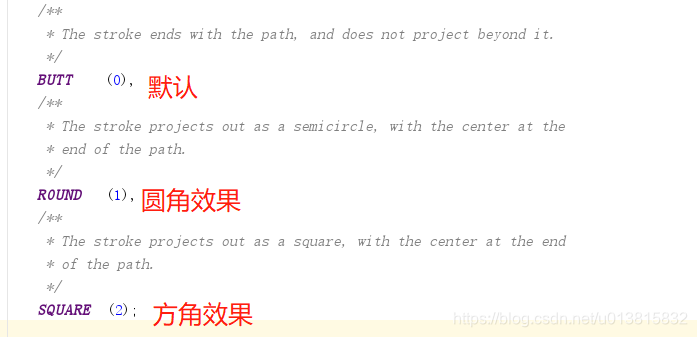
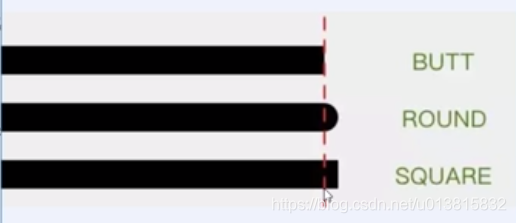
setStrokeCap: 圆角效果
三个可选值
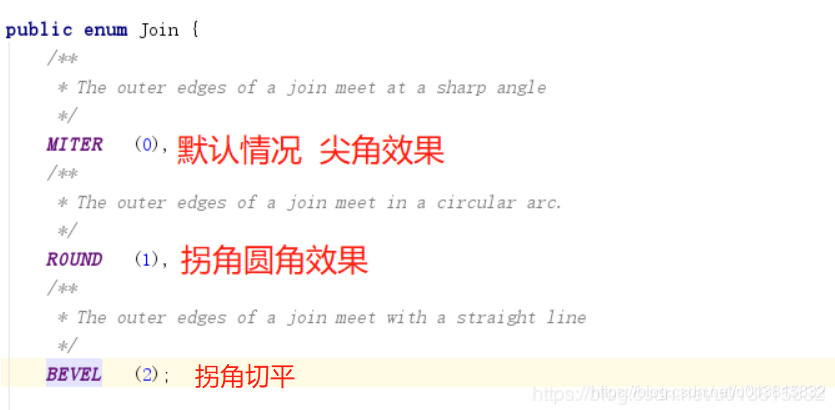
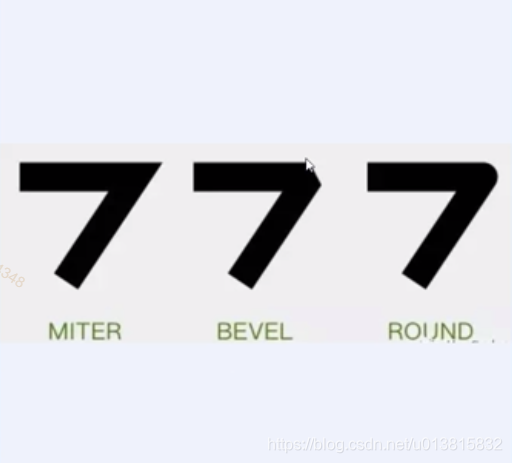
setStrokeJoin :拐角的样式
paint.setShader(new SweepGradient(200,200, Color.BLUE,Color.RED));
稍后再看。。
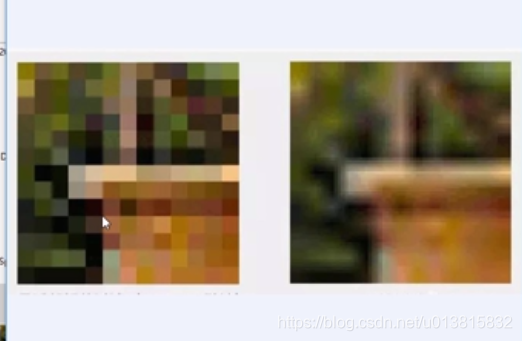
paint.setFilterBitmap(true);//设置双线性过滤,可以让马赛克效果更平滑自然

这里比较重要的是
paint.getFontMetrics()方法
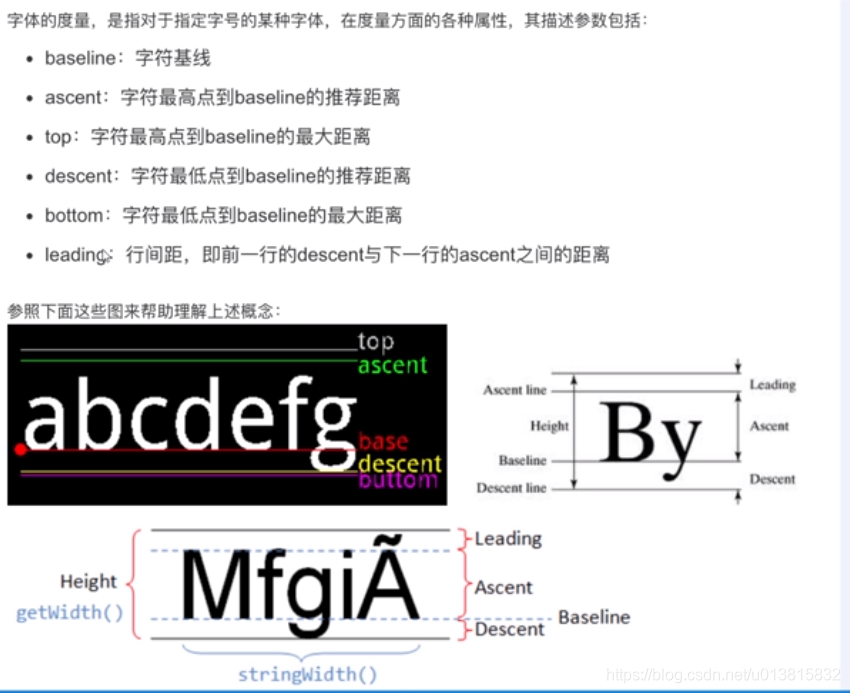
文本的高度=descent的高度----asent的高度
二:Pain颜色相关
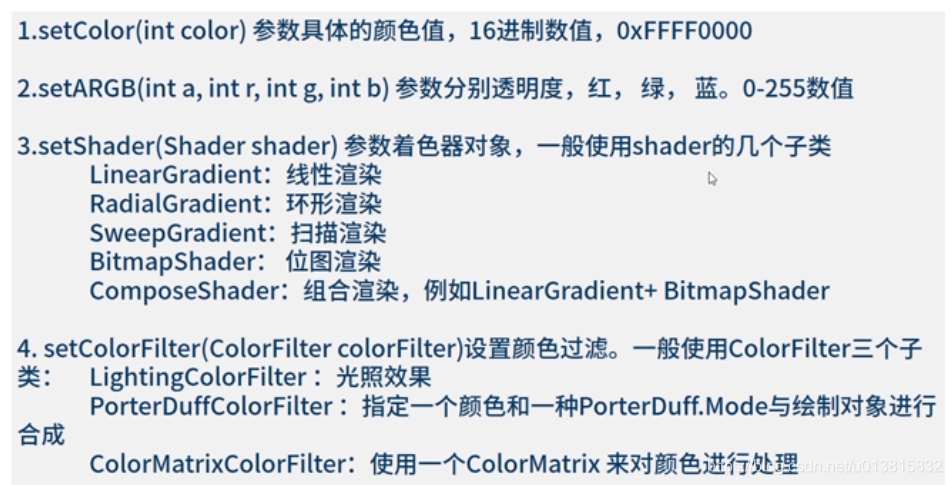
我们看一下第三条
pain.setShader(Shader shader)参数着色器对象 一般会使用shader的几个子类
LinerGradient 线性渲染
RadiaGradient 环形渲染
SweepGradient 扫描渲染
BitmapShader 位图渲染
ComposeShader 组合渲染 例如 LinerGradient + BitmapShader
LinerGradient 线性渲染:
构造方法:
* @param x0       The x-coordinate for the start of the gradient line
* @param y0       The y-coordinate for the start of the gradient line
* @param x1       The x-coordinate for the end of the gradient line
* @param y1       The y-coordinate for the end of the gradient line    渐变两个端点的位置
* @param color0   The color at the start of the gradient line.
* @param color1   The color at the end of the gradient line.          端点的颜色
* @param tile     The Shader tiling mode                            端点范围之外的着色规则,类型是TileMode  后面讲解
public LinearGradient(float x0, float y0, float x1, float y1,
        @ColorInt int color0, @ColorInt int color1,
        @NonNull TileMode tile)
例如
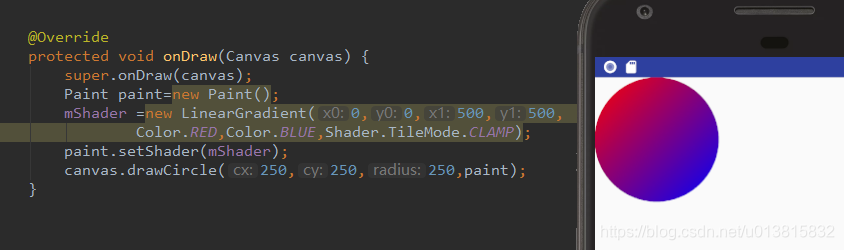
Paint paint=new Paint();
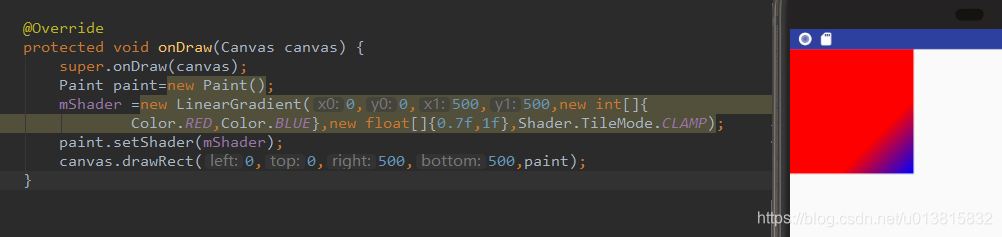
mShader =new LinearGradient(0,0,500,500,
Color.RED,Color.BLUE,Shader.TileMode.CLAMP);
paint.setShader(mShader);
canvas.drawCircle(250,250,250,paint);效果: 从0,0 由红色 到500,500到蓝色的一个渐变过程
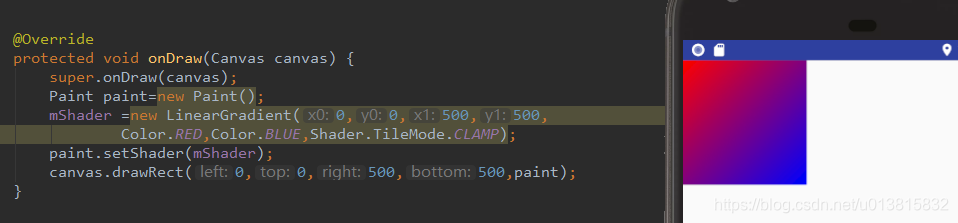
矩形看着更清楚一点
@param x0 The x-coordinate for the start of the gradient line
* @param y0 The y-coordinate for the start of the gradient line
* @param x1 The x-coordinate for the end of the gradient line
* @param y1 The y-coordinate for the end of the gradient line 渐变两个端点的位置
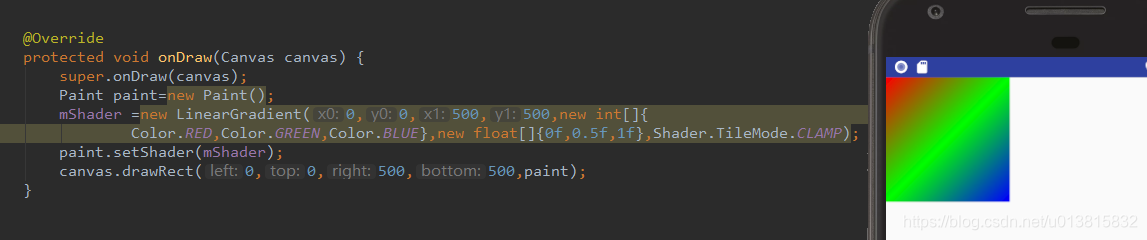
* @param colors The colors to be distributed along the gradient line 渐变数组
* @param positions May be null. The relative positions [0..1] of
* each corresponding color in the colors array. If this is null,
* the the colors are distributed evenly along the gradient line.表示是线性渲染的比例 跟 颜色数组是对应的一一对应的关系 比如第一个是红色 positin的值是0.5 那意思是红色渲染到50%的位置
* @param tile The Shader tiling mode 端点范围之外的着色规则,类型是TileMode 后面讲解
public LinearGradient(float x0, float y0, float x1, float y1, @NonNull @ColorInt int colors[],
@Nullable float positions[], @NonNull TileMode tile)
例子:
这里的canvas.drawRect(left ,top,right,bottom) 分别是
- 原理:矩形的对角线顶点确定一个矩形
一般是采用左上角和右下角的两个点的坐标。
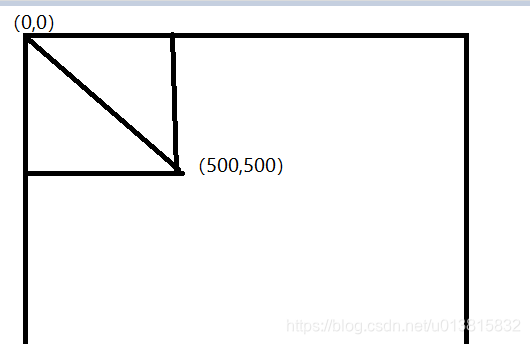
所以这个对象线是
渐变渲染过程
RadiaGradient 环形渲染
同样有两个 构造方法
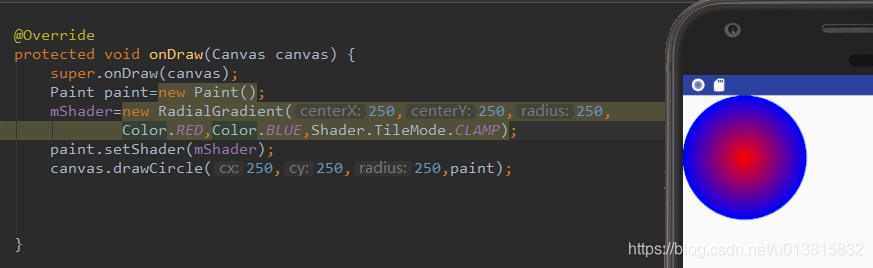
  @param centerX     The x-coordinate of the center of the radius
 * @param centerY     The y-coordinate of the center of the radius    辐射中心的坐标
 * @param radius      Must be positive. The radius of the circle for this gradient  辐射中心的半径
 * @param centerColor The color at the center of the circle.   辐射中心的颜色值
 * @param edgeColor   The color at the edge of the circle.   辐射边缘的颜色值
 * @param tileMode    The Shader tiling mode   端点范围之外的着色规则,类型是TileMode 后面讲解
 */
public RadialGradient(float centerX, float centerY, float radius,
        @ColorInt int centerColor, @ColorInt int edgeColor, @NonNull TileMode tileMode) {
例子
第二个构造方法
@param centerX The x-coordinate of the center of the radius *
 @param centerY The y-coordinate of the center of the radius 辐射中心的坐标
* @param radius Must be positive. The radius of the circle for this gradient 辐射中心的半径
 * @param colors   The colors to be distributed between the center and edge of the circle  渐变数组
 * @param stops    May be <code>null</code>. Valid values are between <code>0.0f</code> and
 *                 <code>1.0f</code>. The relative position of each corresponding color in
 *                 the colors array. If <code>null</code>, colors are distributed evenly
 *                 between the center and edge of the circle.
* @param tileMode The Shader tiling mode 端点范围之外的着色规则,类型是TileMode 后面讲解
 */
public RadialGradient(float centerX, float centerY, float radius,
        @NonNull @ColorInt int colors[], @Nullable float stops[],
        @NonNull TileMode tileMode) {
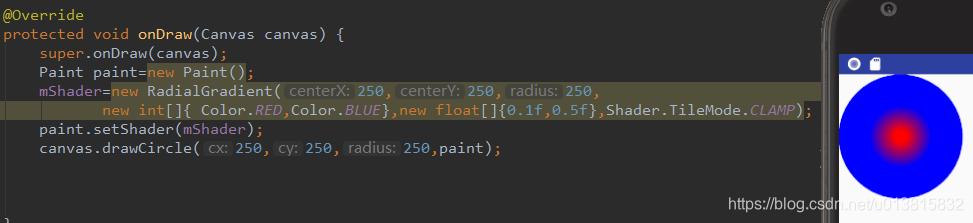
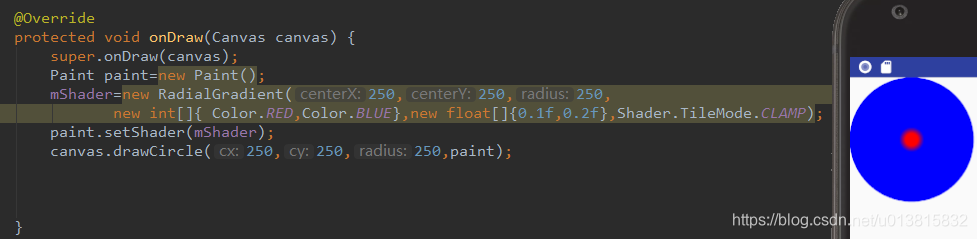
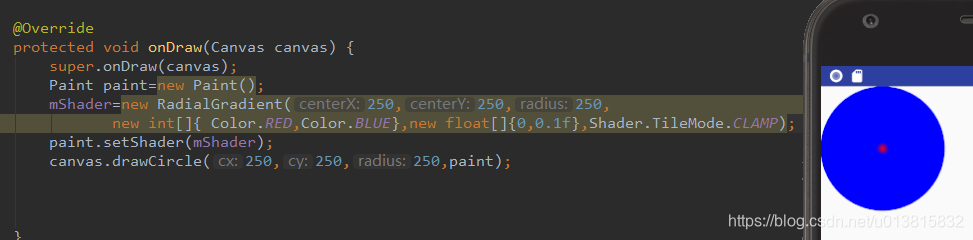
做了几个测试 可以参考一下
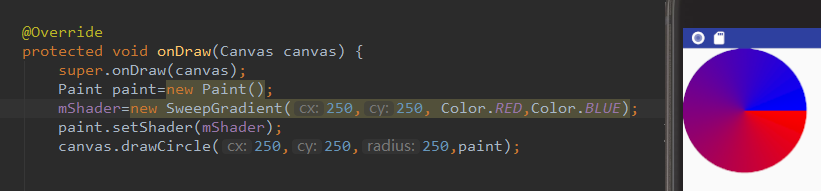
SweepGradient 扫描渲染
还是两个构造方法:===跟上述的是一样的
 * @param cx       The x-coordinate of the center
 * @param cy       The y-coordinate of the center   中心的点
 * @param color0   The color to use at the start of the sweep//开始扫描的颜色
 * @param color1   The color to use at the end of the sweep //结束扫描的颜色
 */
public SweepGradient(float cx, float cy, @ColorInt int color0, @ColorInt int color1) {
这个圆是从开始点的位置顺时针旋转360度,
 * @param cx       The x-coordinate of the center
 * @param cy       The y-coordinate of the center
 * @param colors   The colors to be distributed between around the center.
 *                 There must be at least 2 colors in the array.
 * @param positions May be NULL. The relative position of
 *                 each corresponding color in the colors array, beginning
 *                 with 0 and ending with 1.0. If the values are not
 *                 monotonic, the drawing may produce unexpected results.
 *                 If positions is NULL, then the colors are automatically
 *                 spaced evenly.
 */
public SweepGradient(float cx, float cy,
        @NonNull @ColorInt int colors[], @Nullable float positions[]) {
BitmapShader 位图渲染
构造方法:只有一个构造方法
/ * @param bitmap The bitmap to use inside the shader     用来做模板的bitmap对象
 * @param tileX The tiling mode for x to draw the bitmap in.    横向着色规则 类型是TileMode
 * @param tileY The tiling mode for y to draw the bitmap in.     纵向着色规则  类型是TileMode
 */
public BitmapShader(@NonNull Bitmap bitmap, @NonNull TileMode tileX, @NonNull TileMode tileY) {
放图片:


我们可以看到图片被拉伸了,横向:CLAMP:超出的这部分会以最后一个像素开始横向拉伸
纵向:同理
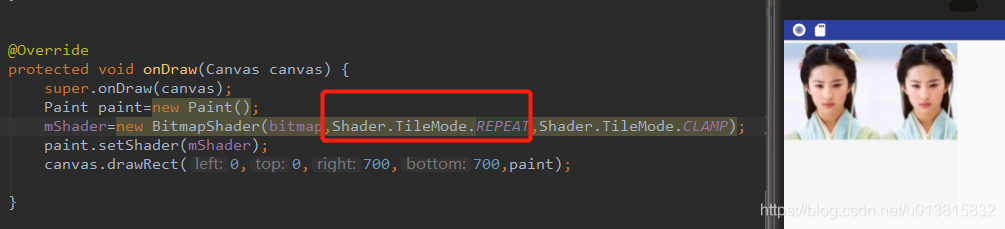
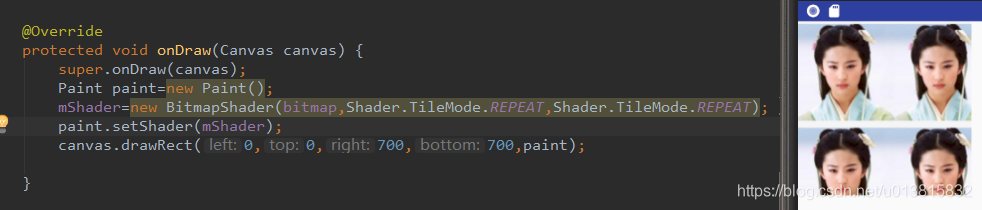
当把横向的设置成了REPEAT:后 当超出图片内容后会水平方向平铺
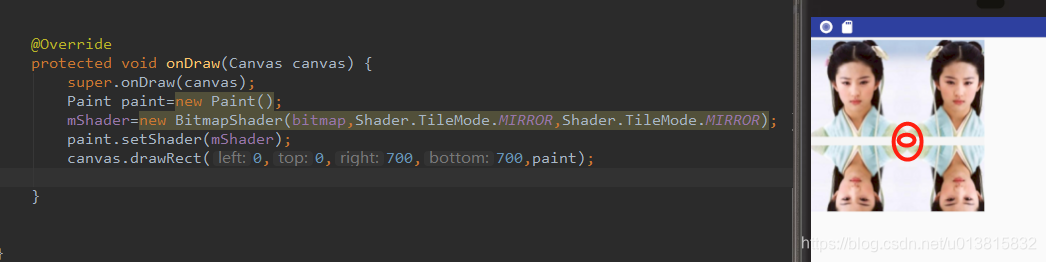
当我们设置为MIRROR:展示效果为镜像翻转
总结一下TileMode:
REPEAT :当我们的绘制区域超过渲染部分时,重复排版
CLAMP:当我们的绘制区域超过渲染部分时 ,会以最后一个像素拉伸排版
MIRROR:当我们的绘制区域超过渲染部分时,镜像翻转排版
还有一种组合渲染ComposeShader
构造方法:
 @param shaderA  The colors from this shader are seen as the "dst" by the mode
 * @param shaderB  The colors from this shader are seen as the "src" by the mode
 * @param mode   组合两种shader的颜色模式
*/
public ComposeShader(@NonNull Shader shaderA, @NonNull Shader shaderB,
        @NonNull PorterDuff.Mode mode) {
例子:

PorterDuff.Mode :指的是图层混合规则:有18种混合规则,每种规则有他自己的算法下一节我们详细学习一下图层混合模式

CSDN联合极客时间,共同打造面向开发者的精品内容学习社区,助力成长!
更多推荐


 0
0 0
0- 0


 已为社区贡献2条内容

所有评论(0)