【SpringMVC】使用注解(annotation)完成SpringMVC的开发
文章目录一、新建一个web项目二、导入相关jar包三、编写web.xml文件,注册DispatcherServlet四、编写SpringMVC配置文件五、创建对应的控制类xxxController六、测试运行一、新建一个web项目略…二、导入相关jar包略…三、编写web.xml文件,注册DispatcherServletweb.xml(固定写法):<?xml version="1.0" e
·
文章目录
一、新建一个web项目
略…
二、导入相关jar包
略…
三、编写web.xml文件,注册DispatcherServlet
web.xml(固定写法):
<?xml version="1.0" encoding="UTF-8"?>
<web-app xmlns="http://xmlns.jcp.org/xml/ns/javaee"
         xmlns:xsi="http://www.w3.org/2001/XMLSchema-instance"
         xsi:schemaLocation="http://xmlns.jcp.org/xml/ns/javaee http://xmlns.jcp.org/xml/ns/javaee/web-app_4_0.xsd"
         version="4.0">

    <!--配置DispatchServlet: 这个是springMVC的核心(请求分发器/前端控制器)-->
    <servlet>
        <servlet-name>springmvc</servlet-name>
        <servlet-class>org.springframework.web.servlet.DispatcherServlet</servlet-class>

        <!--DispatcherServlet需要绑定springmvc的配置文件-->
        <init-param>
            <param-name>contextConfigLocation</param-name>
            <param-value>classpath:springmvc-servlet.xml</param-value>
        </init-param>

        <!--设置启动级别为1,和服务器一起启动-->
        <load-on-startup>1</load-on-startup>
    </servlet>


    <!--在springmvc中,/只会去匹配所有的请求,不会匹配jsp页面;/*会去匹配所有的请求,包括匹配jsp页面-->
    <servlet-mapping>
        <servlet-name>springmvc</servlet-name>
        <url-pattern>/</url-pattern>
    </servlet-mapping>
</web-app>
四、编写SpringMVC配置文件
springmvc-servlet.xml(基本固定):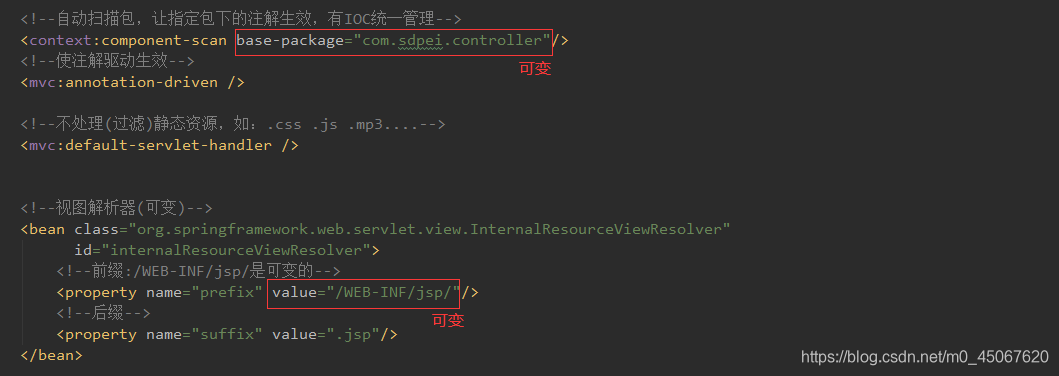
<?xml version="1.0" encoding="UTF-8"?>
<beans xmlns="http://www.springframework.org/schema/beans"
       xmlns:xsi="http://www.w3.org/2001/XMLSchema-instance"
       xmlns:context="http://www.springframework.org/schema/context"
       xmlns:mvc="http://www.springframework.org/schema/mvc"
       xsi:schemaLocation="http://www.springframework.org/schema/beans
        https://www.springframework.org/schema/beans/spring-beans.xsd http://www.springframework.org/schema/context https://www.springframework.org/schema/context/spring-context.xsd http://www.springframework.org/schema/mvc https://www.springframework.org/schema/mvc/spring-mvc.xsd">


    <!--自动扫描包,让指定包下的注解生效,有IOC统一管理-->
    <context:component-scan base-package="com.sdpei.controller"/>
    <!--使注解驱动生效-->
    <mvc:annotation-driven />

    <!--不处理(过滤)静态资源,如:.css .js .mp3....-->
    <mvc:default-servlet-handler />


    <!--视图解析器(可变)-->
    <bean class="org.springframework.web.servlet.view.InternalResourceViewResolver"
          id="internalResourceViewResolver">
        <!--前缀:/WEB-INF/jsp/是可变的-->
        <property name="prefix" value="/WEB-INF/jsp/"/>
        <!--后缀-->
        <property name="suffix" value=".jsp"/>
    </bean>

</beans>
五、创建对应的控制类xxxController
需要使用到的注解
@Controller:其作用与 <context:component-scan base-package="com.sdpei.controller"/> 相结合,代替了"处理器映射器"和"处理器适配器"的作用。
@RequestMapping("/xxx"):其作用可以认为是定位请求的。
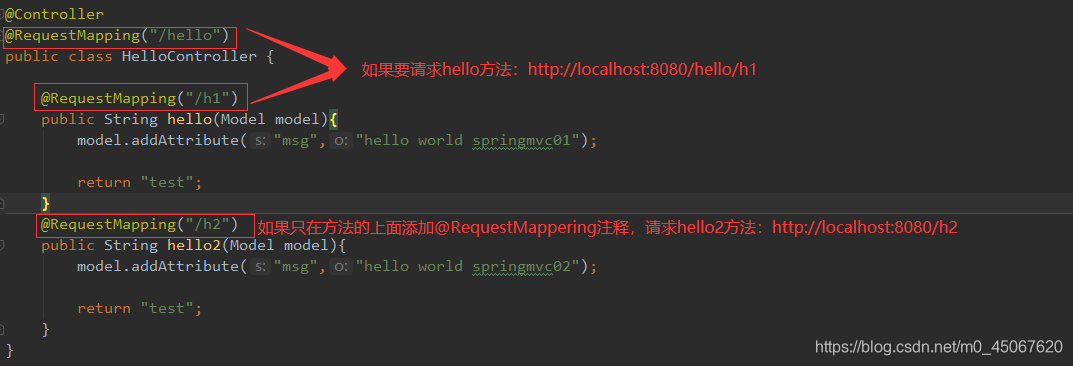
HelloController :
@Controller
@RequestMapping("/hello")
public class HelloController {

    @RequestMapping("/h1")
    public String hello(Model model){
        model.addAttribute("msg","hello world springmvc01");

        return "test";
    }
    @RequestMapping("/h2")
    public String hello2(Model model){
        model.addAttribute("msg","hello world springmvc02");

        return "test";
    }
}


六、测试运行


CSDN联合极客时间,共同打造面向开发者的精品内容学习社区,助力成长!
更多推荐


 0
0 0
0- 0


 已为社区贡献2条内容

所有评论(0)