广州大学计算机视觉实验六:车牌识别
实验六车牌识别目录实验六车牌识别一、实验目的二、基本要求三、实验软件四、实验内容五、实验过程1、寻找一个合适的数据集。2、处理数据3、选择检测模型4、训练检测模型5、对验证集图片进行检测6、字符识别7、全部代码一、实验目的本实验课程是计算机、智能、物联网等专业学生的一门专业课程,通过实验,帮助学生更好地掌握计算机视觉相关概念、技术、原理、应用等;通过实验提高学生编写实验报告、总结实验结果的能力;使
相关资料
广州大学计算机视觉实验一:图像处理入门
广州大学计算机视觉实验二:摄像机几何
广州大学计算机视觉实验三:图像滤波
广州大学计算机视觉实验四:图像分割
广州大学计算机视觉实验五:简易数字识别
广州大学计算机视觉实验六:车牌识别
六份实验报告下载链接Click me🔗
实验六 车牌识别
一、实验目的
本实验课程是计算机、智能、物联网等专业学生的一门专业课程,通过实验,帮助学生更好地掌握计算机视觉相关概念、技术、原理、应用等;通过实验提高学生编写实验报告、总结实验结果的能力;使学生对计算机视觉、模式识别实现等有比较深入的认识。
1.掌握模式识别中涉及的相关概念、算法。
2.熟悉计算机视觉中的具体编程方法;
3.掌握问题表示、求解及编程实现。
二、基本要求
1.实验前,复习《计算机视觉与模式识别》课程中的有关内容。
2.准备好实验数据。
3.编程要独立完成,程序应加适当的注释。
4.完成实验报告。
三、实验软件
使用Python实现。
四、实验内容
任选车牌检测与识别数据集,如SSIG、UFPR,参考文献
https://openaccess.thecvf.com/content_ECCV_2018/papers/Zhenbo_Xu_Towards_End-to-End_License_ECCV_2018_paper.pdf
•任选模型进行车牌检测
•任选机器学习模型进行车牌识别
五、实验过程
1、寻找一个合适的数据集。
想采用深度学习进行完成,因此数据量得保证上千,并且不想耗费太多计算资源,在Colab上实验需要反复上传数据比较麻烦。
在Kaggle上找到了一个合适的印度车牌数据集,数据集包含1万张印度汽车牌照的图片。

展示数据集部分图片:

2、处理数据
Json文件预处理:数据集呈现在一个Json文件中,指定内容、标签、图像宽度、图像高度以及右下和左上边界框的x和y坐标。我们必须将所有字段分开,并以csv格式存储它们。为此,我使用了python中的pandas库。运行seperate.py。
在YOLO中,我们必须为每个图像创建一个.txt文件,并且应该与图像同名。对于每个图像,txt文件将包含5个值—类标签,在我们的例子中是0,绝对中心坐标,x_center和y_center,以及包围框相对于整个图像形状的绝对宽度和高度。运行generating_annotations_test.py 。
3、选择检测模型
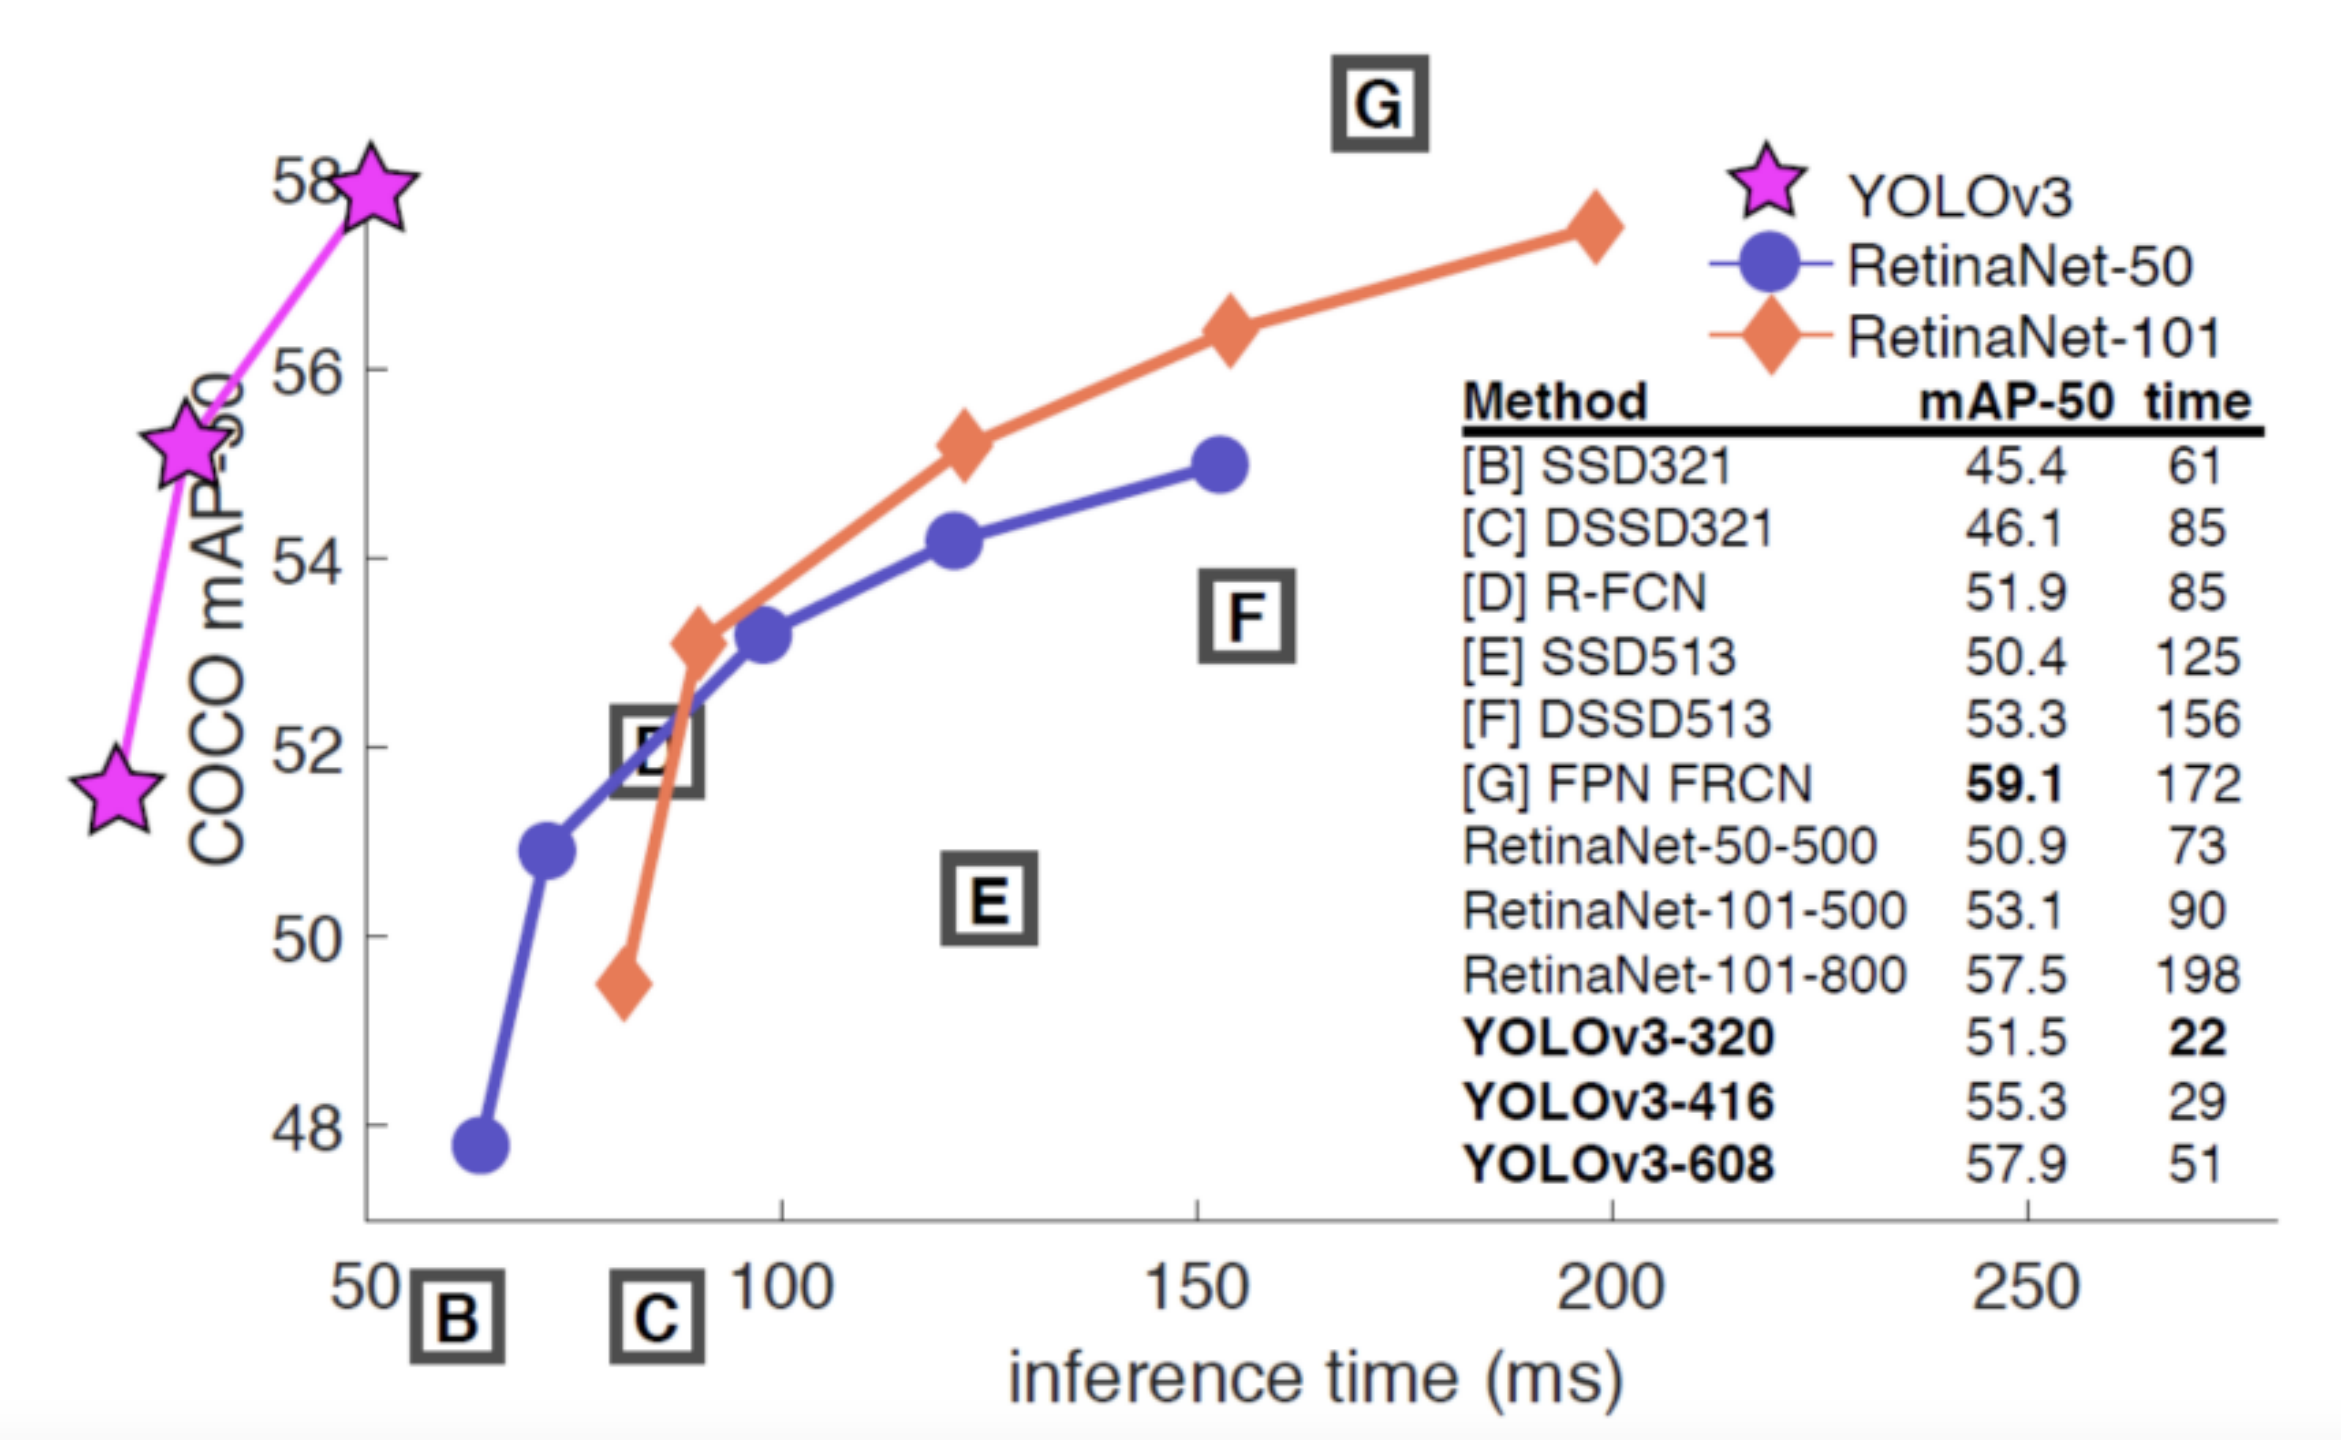
用于对象检测:对象检测的主要部分是决定使用哪个模型。有一个广泛的池模型可供我们,每个模型的变化。广义或广泛使用的类型可以分为YOLO,RetinaNet和SSD5模型。
从下图可以看出,最好的模型是YOLOv3和RetinaNet。YOLOv3具有与RetinaNet相当的平均精度(MAP)性能。然而,该算法的推理时间比RetinaNet要短。因为YOLOv3模型需要较多的计算资源,而谷歌Colab服务器的资源不够,因此,我使用YOLOv3模型来进行对象检测。

YOLO的工作原理:将单个图像划分为预先确定大小(N X N)的单元格,利用计算机视觉和定位对每个单元格或网格进行分类。每个单元格由一组5个值表示——类标签、单元格中心(x和y)、每个单元格的宽度和高度。
Ground truth和预测box之间的交集称为交并比(IOU)。我们将每个网格的置信度定义为p(object)*IOU。
4、训练检测模型
首先划分train和test集
选择darknet框架需要YOLO模型,darknet是一个较为轻型的完全基于C与CUDA的开源深度学习框架,其主要特点就是容易安装,移植性非常好,支持CPU与GPU两种计算方式。
安装指令如下:
git clone https://github.com/AlexeyAB/darknet.git

训练检测模型命令如下:
./darknet detector train data/obj.data yolo-obj.cfg yolo-obj_last.weights

5、对验证集图片进行检测
python predict.py --image ./data/obj/image.jpg --config yolo-obj.cfg --weights yolo-obj.weights --classes data/obj.names

6、字符识别
对于光学字符识别:在获得车牌上所需的边界框后,我们需要生成包含字符和数字的字符串。这些任务是使用pytesseract库完成的。
Tesseract 4增加了一个新的基于神经网络(LSTM)的OCR引擎,它专注于行识别,但也仍然支持Tesseract 3的遗留的Tesseract OCR引擎,它通过识别字符模式工作。
Tesseract需要一些处理来改善OCR结果,图像需要被放缩,图像有非常多的差异,另外还有水平排布的文字。并且,可以支持中文字体的识别。
我们将检测到的车牌号码框,导入检测即可

输出:HR 26DG6 167
这个车牌比较正,所以非常好识别,如果出现倾斜较多的情况,则需要通过图像预处理进行修正。
识别代码如下:
import cv2
import pytesseract

img = cv2.imread('plate.jpg')
print(pytesseract.image_to_string(img))
7、全部代码
seperate.py
import pandas as pd
file_open=open('Indian_Number_Plates.json','r+',encoding='utf-8')
file_read=file_open.read()

seperate=file_read.split('"{""')
seperate=seperate[1:]

import re
seperate_by_des=[]
for i in seperate:
    seperate_by_des.append(re.split(',',i))

for i in range(0,len(seperate_by_des)):
    for j in range(0,len(seperate_by_des[i])):
        seperate_by_des[i][j]=seperate_by_des[i][j].replace('"','')

content=[]
label=[]
x_1=[]
y_1=[]
x_2=[]
y_2=[]

h=[]
w=[]

x_11=[]
y_11=[]
x_22=[]
y_22=[]
notes=[]
extras=[]

for i in range(0,len(seperate_by_des)):
    if(len(seperate_by_des[i])==10):
         x_11.append('')
         x_22.append('')
         y_11.append('')
         y_22.append('')
         for j in range(0,len(seperate_by_des[i])):
                if(j==0):
                     content.append(seperate_by_des[i][j].replace('content: ',''))
                if(j==1):
                    s=seperate_by_des[i][j].replace('annotation:[{label:[','')
                    label.append(s.replace(']',''))
                if(j==2):
                    notes.append(seperate_by_des[i][j].replace('notes:',''))
                if(j==3):
                    x_1.append(seperate_by_des[i][j].replace('points:[{x:',''))
                if(j==4):
                    top_left=seperate_by_des[i][j].replace('y:','')
                    y_1.append(top_left.replace('}',''))
                if(j==5):
                    x_2.append(seperate_by_des[i][j].replace('{x:',''))
                if(j==6):
                    right_bottom=seperate_by_des[i][j].replace('y:','')
                    y_2.append(right_bottom.replace('}]',''))
                if(j==7):
                    w.append(seperate_by_des[i][j].replace('imageWidth:',''))
                if(j==8):
                    height=seperate_by_des[i][j].replace('imageHeight:','')
                    h.append(height.replace('}]',''))
                if(j==9):
                    ex=seperate_by_des[i][j].replace('extras:','')
                    extras.append(seperate_by_des[i][j].replace('}',''))
    else:
        for j in range(0,len(seperate_by_des[i])):
            if(j==0):
                content.append(seperate_by_des[i][j].replace('content: ',''))
            if(j==1):
                s=seperate_by_des[i][j].replace('annotation:[{label:[','')
                label.append(s.replace(']',''))
            if(j==2):
                notes.append(seperate_by_des[i][j].replace('notes:',''))
            if(j==3):
                x_1.append(seperate_by_des[i][j].replace('points:[{x:',''))
            if(j==4):
                top_left=seperate_by_des[i][j].replace('y:','')
                y_1.append(top_left.replace('}',''))
            if(j==5):
                x_2.append(seperate_by_des[i][j].replace('{x:',''))
            if(j==6):
                right_bottom=seperate_by_des[i][j].replace('y:','')
                y_2.append(right_bottom.replace('}]',''))
            if(j==7):
                w.append(seperate_by_des[i][j].replace('imageWidth:',''))
            if(j==8):
                height=seperate_by_des[i][j].replace('imageHeight:','')
                h.append(height.replace('}',''))
            if(j==11):
                x_11.append(seperate_by_des[i][j].replace('points:[{x:',''))
            if(j==12):
                top_left=seperate_by_des[i][j].replace('y:','')
                y_11.append(top_left.replace('}',''))
            if(j==13):
                x_22.append(seperate_by_des[i][j].replace('{x:',''))
            if(j==14):
                bottom_right=seperate_by_des[i][j].replace('y:','')
                y_22.append(bottom_right.replace('}]',''))
            if(j==17):
                ex==seperate_by_des[i][j].replace('extras:','')
                extras.append(ex.replace('}',''))


content=pd.DataFrame(content)
label=pd.DataFrame(label)
x_1=pd.DataFrame(x_1)

y_1=pd.DataFrame(y_1)
x_2=pd.DataFrame(x_2)
y_2=pd.DataFrame(y_2)

h=pd.DataFrame(h)
w=pd.DataFrame(w)

x_11=pd.DataFrame(x_11)
y_11=pd.DataFrame(y_11)
x_22=pd.DataFrame(x_22)
y_22=pd.DataFrame(y_22)
notes=pd.DataFrame(notes)
extras=pd.DataFrame(extras)


dt=pd.concat((content,label,w,h,x_1,y_1,x_2,y_2,x_11,y_11,x_22,y_22,notes,extras),axis=1)
dt.columns=(['content','label','width','height','x_1','y_1','x_2','y_2','x_11','y_11','x_22','y_22','notes','extras'])

dt.to_csv('indian_license_plate_csv.csv',index=False)
generating_annotations_test.py
import pandas as pd
data=pd.read_csv('bounding_box_values.csv')

def convert(width,height,x1,x2,y1,y2):
    dw=1./width
    dh=1./height
    x=(x1+x2)/2.0
    y=(y1+y2)/2.0
    w=x2-x1
    h=y2-y1
    x=x*dw
    w=w*dw
    y=y*dh
    h=h*dh
    return (x,y,h,w)


for i in range(0,len(data)):
    file=open('text/image('+str(i)+').txt','w')
    file.close()


for i in range(0,len(data)):
    x,y,h,w=convert(data.iloc[i]['width'],data.iloc[i]['height'],data.iloc[i]['x_top_left'],data.iloc[i]['x_bottom_right'],data.iloc[i]['y_top_left'],data.iloc[i]['y_bottom_right'])
    file=open('text/image('+str(i)+').txt','r+')
    file.write('0'+' ')
    file.write(str(x)+' ')
    file.write(str(y)+' ')
    file.write(str(w)+' ')
    file.write(str(h)+' ')

    file.close()


for i in range(0,len(data)):
    if(data.iloc[i]['x1_top_left']!=0):
        print(i)
        x,y,h,w=convert(data.iloc[i]['width'],data.iloc[i]['height'],data.iloc[i]['x1_top_left'],data.iloc[i]['x1_bottom_right'],data.iloc[i]['y1_top_left'],data.iloc[i]['y1_bottom_right'])
        file=open('text/image('+str(i)+').txt','a+')
        file.write('\n0'+' ')
        file.write(str(x)+' ')
        file.write(str(y)+' ')
        file.write(str(w)+' ')
        file.write(str(h)+' ')

        file.close()
predict.py
import cv2
import argparse
import numpy as np

ap = argparse.ArgumentParser()
ap.add_argument('-i', '--image', required=True,
                help = 'path to input image')
ap.add_argument('-c', '--config', required=True,
                help = 'path to yolo config file')
ap.add_argument('-w', '--weights', required=True,
                help = 'path to yolo pre-trained weights')
ap.add_argument('-cl', '--classes', required=True,
                help = 'path to text file containing class names')
args = ap.parse_args()


def get_output_layers(net):

    layer_names = net.getLayerNames()

    output_layers = [layer_names[i[0] - 1] for i in net.getUnconnectedOutLayers()]

    return output_layers


def draw_prediction(img, class_id, confidence, x, y, x_plus_w, y_plus_h):

    label = str(classes[class_id])

    color = COLORS[class_id]

    cv2.rectangle(img, (x,y), (x_plus_w,y_plus_h), color, 2)

    cv2.putText(img, label, (x-10,y-10), cv2.FONT_HERSHEY_SIMPLEX, 0.5, color, 2)

    image=img[y:y_plus_h,x:x_plus_w]
    cv2.imshow('cropped',image)
    cv2.imwrite("trying.jpg",image)


image = cv2.imread(args.image)

Width = image.shape[1]
Height = image.shape[0]
scale = 0.00392

classes = None

with open(args.classes, 'r') as f:
    classes = [line.strip() for line in f.readlines()]

COLORS = np.random.uniform(0, 255, size=(len(classes), 3))

net = cv2.dnn.readNet(args.weights, args.config)

blob = cv2.dnn.blobFromImage(image, scale, (416,416), (0,0,0), True, crop=False)

net.setInput(blob)

outs = net.forward(get_output_layers(net))

class_ids = []
confidences = []
boxes = []
conf_threshold = 0.5
nms_threshold = 0.4

#only consider predictions grater than 0.5
for out in outs:
    for detection in out:
        scores = detection[5:]
        class_id = np.argmax(scores)
        confidence = scores[class_id]
        if confidence > 0.5:
            center_x = int(detection[0] * Width)
            center_y = int(detection[1] * Height)
            w = int(detection[2] * Width)
            h = int(detection[3] * Height)
            x = center_x - w / 2
            y = center_y - h / 2
            class_ids.append(class_id)
            confidences.append(float(confidence))
            boxes.append([x, y, w, h])


indices = cv2.dnn.NMSBoxes(boxes, confidences, conf_threshold, nms_threshold)

for i in indices:
    i = i[0]
    box = boxes[i]
    x = box[0]
    y = box[1]
    w = box[2]
    h = box[3]
    draw_prediction(image, class_ids[i], confidences[i], round(x), round(y), round(x+w), round(y+h))


cv2.imshow("object detection", image)
cv2.waitKey()

cv2.imwrite("object-detection.jpg", image)
cv2.destroyAllWindows()
更多推荐
 已为社区贡献4条内容


所有评论(0)